
Today, we will draw a Rainbow Zentangle and a Sun Mandala. These two designs are fun, relaxing, and easy to create. You don’t need to be an artist. Just follow the steps, and you will see a beautiful drawing come to life!
Why Try This Tutorial?
Drawing is a great way to relax. It helps you focus and forget about stress. When you create patterns, your mind slows down. It’s like meditation, but with a pen and colors!
Also, drawing improves your creativity. You learn how to mix shapes, lines, and colors. The more you draw, the more ideas you get.
What Will You Learn?
- How to draw simple Zentangle patterns
- The technique to create a sun mandala with easy steps
- How to blend rainbow colors for a magical effect
What Do You Need?
Just some paper, a pen, and colors. That’s it!
Let’s Begin!
Take a deep breath. Grab your materials. Find a quiet space.
Now, let’s start drawing! Follow each step, and enjoy the process.
Are you ready? Let’s create something beautiful together!
The Difference Between a Mandala and a Zentangle
A mandala and a zentangle may look similar, but they are very different in structure, purpose, and meaning.
A mandala is a circular design with repeating patterns that radiate from the center. It often represents balance, harmony, and the universe. Many cultures use mandalas for meditation, spiritual growth, and self-reflection. A sun mandala, for example, symbolizes energy, strength, and positivity.
On the other hand, a zentangle is a free-flowing pattern created within structured spaces. Unlike a mandala, it does not need to be symmetrical or circular. Zentangle drawing focuses on relaxation, creativity, and mindfulness. It encourages artists to enjoy the process rather than worry about the final result.
Both art forms are excellent for reducing stress, improving focus, and enhancing creativity. However, while a mandala follows specific rules and symmetry, a zentangle allows more freedom and spontaneity.
If you love order and structure, a mandala is perfect for you. But if you prefer free-flowing creativity, a zentangle is a great choice. Either way, both techniques bring a sense of calm and joy.
Now, which one do you prefer—a detailed sun mandala or a playful zentangle?
How to Draw the Rainbow Zentangle and the Sun Mandala
Materials Needed
- A4 Canson or paper (white)
- Compass
- Protractor
- 12 ” ruler
- Pencil
- Black drawing pen (0.2)
- Colored Stabilo fine point 88 ( the colors used codes are: 88/50- 88/40- 88/54- 88/44- 88/43- 88/36- 88/57-88/41-88/55)
Step by step drawing instructions of the Rainbow Zentangle
- Take the right bottom corner of your paper as a center and trace 9 different circles with the following radiuses: 1 cm, 2 cm, 3 cm, 4 cm, 5 cm, 6 cm , 7 cm, 8 cm, and 9 cm.
- Using the colored stabilo pens start filling the circles with patterns.
- In the first circle trace intersected curves using the 88/50 dark red Stabilo.
- Then, in the second, trace woven lines using the vibrant red 88/40.
- In the next row trace seamless curves using the orange Stabilo pen 88/54.
- In the fourth circle, trace wavy lines, and fill them consecutively as follows: fully colored, points, vertical stripes, use the following yellow pen 88/44.
- Then, in the 5th circle, draw green filled circles using the 88/43 fine Stabilo pen.
- Now fill the 6th circle with woven lines again using the 88/36 dark green.
- In the 7th circle, draw seamless zigzags with light blue 88/57.
- Then, in the next row, draw intersected curves using the 88/41 Stabilo fine.
- In the last circle, draw diagonal wavy lines. Fill some with purple and others with small circles.(Check the picture below)

Step by step drawing instructions of the Sun Mandala
- Trace the Mandala grid taking the middle of the purple curve as a center for the circles.
The circles’ radii are as follows: 6 cm, 7 cm, 8 cm, and 9 cm.
The grid lines are separated by 20 degrees. (check the picture below)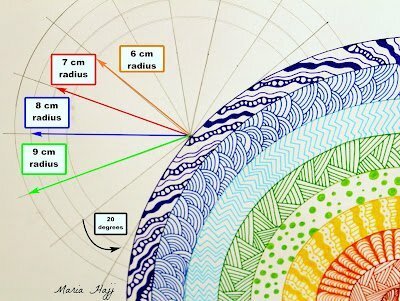
- In the space of the 6 cm circle, retrace the grid lines in black. Trace very small circles on the left side of each line as shown in the picture below. Retrace the outline of the 6 cm circle.
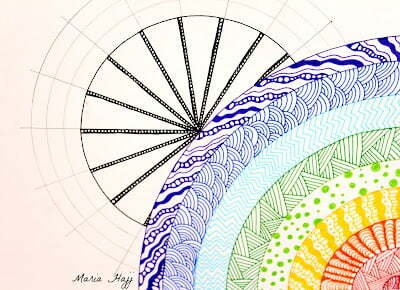
- In the space between the 6th and the 7th circle, and in every grid section trace a triangle (check the pic. below)

- In between each two triangles, draw a smaller triangle.

- Trace an inner outline inside of each large triangle, then trace the small progressive arcs and color the blank space in black as shown below.
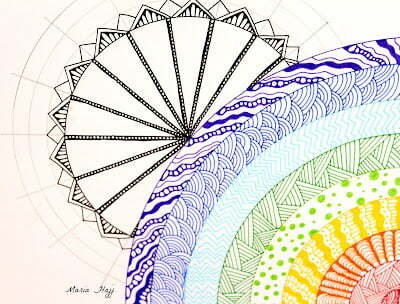
- Draw a long triangle, taking as a starting and ending point the summit of the previous large triangles, and the last circle outline as a limit for the summit.
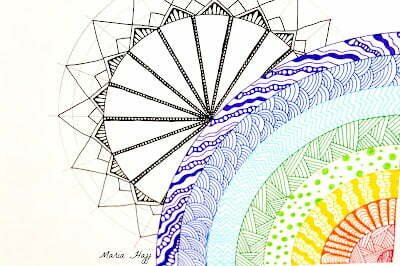
- Trace another inner outline on the right of each long triangle.

- Inside the small triangles: mark a point at the summit, trace two curves underneath it and color the space between them in black.
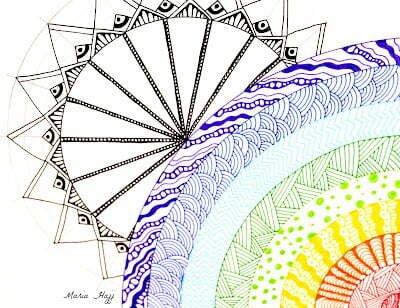
- As a last step, draw triangles between each two long triangles. Draw an empty small circle at the summit of each. Trace a double inner outline at the bottom of each of those triangles and color it in black.
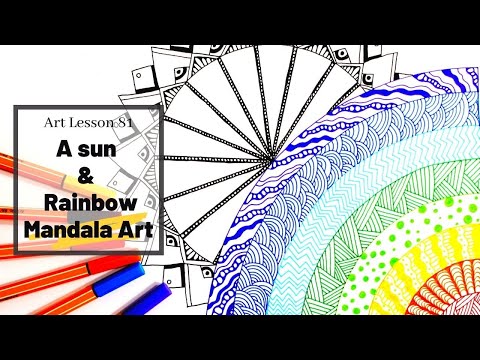
Video Tutorial
Check the video tutorial below for a good clear picture of the Mandala drawing process:
Thank You for Following This Tutorial!
So, did you enjoy this tutorial? Was it easy to follow? I hope you had fun creating your beautiful artwork!
Every drawing is unique. Your colors, patterns, and details make your art special. However, don’t worry about perfection—just enjoy the process!
If you liked this tutorial, then, you will love my other videos. I share more creative ideas on my YouTube channel!
Make sure to SUBSCRIBE so you never miss a new tutorial. Every week, I post fun and relaxing art lessons.
Also, I would love to see your creations! Share your drawings with me on Instagram. Tag me so I can admire your work because your creativity will for sure inspire me to make more tutorials, and, your support means a lot and helps my channel grow!
So, if you know someone who loves art, share this video with them. Let’s spread creativity and relaxation together!