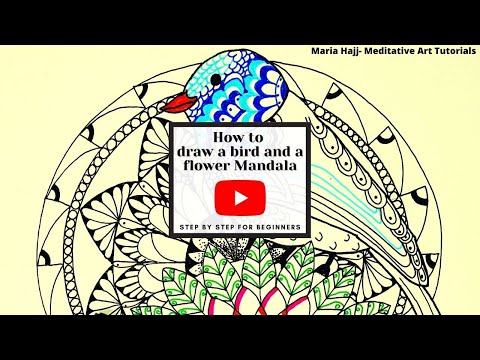
Have you ever found joy in drawing a bird mandala? Personally, I adore them and see them as a powerful source of positive energy.
When I look back, I vividly remember a school assignment where our teacher asked us to write an essay about a person or a living creature that inspires us. Without hesitation, I chose the bird. To me, birds symbolize freedom, and simply watching them soar across the sky fills me with a sense of lightness and possibility.
However, as I grew into a mandala artist, my way of expressing this admiration evolved. Instead of just writing about birds, I started incorporating them into my artwork. Naturally, bird mandalas became a recurring theme in the coloring books I create, allowing me to translate my appreciation for these magnificent creatures into intricate designs. If you’re curious, you can explore my collection right here.
For this particular drawing, I intentionally merged a bird with my mandala designs to infuse them with a sense of positivity and freedom. Through each swirl and pattern, I hope to capture the beauty, grace, and limitless spirit that birds represent.
Materials Needed for This Bird Mandala Drawing

- A4 cardboard
- Compass
- Pencil
- Ruler
- Protractor
- Pencil
- 02 black drawing pen
- 08 black drawing pen
- Colored Stabilo fine 88
Directions:
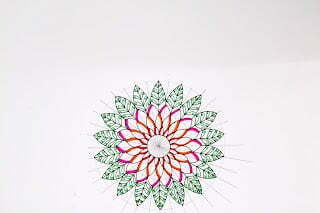
1- Take the third of your paper vertically. Then take the center of that third and place a mark to use it as the center of the circles.

2- Draw a Mandala grid with the following measures: Trace six circles with the following radiuses: 1, 2, 3, 4, 5, and 6 cm. Trace grid lines separated by 10 degrees.

3-Starting from the center of the grid, retrace the outline of the center circle and keep it empty. On the second row, trace a regular petal on each two grid sections.

4- Complete your mandala by drawing on the next row a regular petal on each two grid sections. Each petal should start from the top of one petal and end at the summit of the next.

5-Repeat the previous step on the 4th row.

6- Now, to complete this front Mandala, repeat the regular petal drawing process but this time by extending the petals on the last two rows.

7- Now start decorating these last petals by tracing a leaf pattern in each by drawing a line in the center of each petal and diagonal stripes from each side.

8- Using red, fuchsia, and orange, trace a curved line on one side of each petal as shown in the picture below.

9- Fill each leaf with green swirls, one green swirl on each diagonal.
10- Retrace the 5 cm radius circle’s outline using the black drawing pen without crossing over the petals.
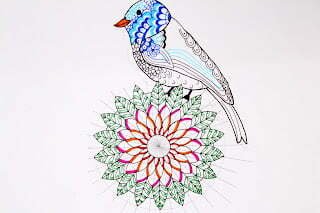
11- On top of this flower mandala, draw the bird and decorate it with beautiful blue and black patterns. Check the video shared below to see how to draw the bird.
12- Take the line between the two petals below the bird’s abdomen as the center of the next mandala grid. Now trace a mandala grid with the following radiuses: 2,4, 6, 6.5, 7, 8.5, and 9 cm.
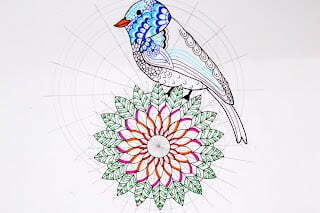
13- In the center circle draw one petal on each grid section. Please note, that this mandala is supposed to be behind the first mandala, so the patterns should not cross over the first mandala. Retrace the outline of the center circle of this mandala. Color the blank space in black and fill the inside of the petals with stippling.

14- On the next row draw one arc petal on each grid section.

15- Next, draw one regular petal above each arc petal and fill it with arcs, and color the blank space in black.

16- Between every 2 petals draw a teardrop and mark a point on top of each, and retrace the outline of the circle.
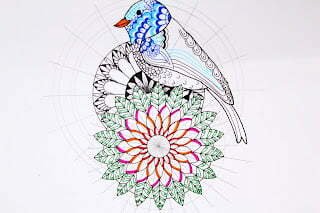
17- Now on the next row, trace one regular petal on each two grid sections. Then fill the inside with teardrops, and color the blank spaces with black.

18- Retrace the outline of the two close circles, and draw little circles between the two lines.

19- Trace in each grid section one half regular petal and decorate its top. Retrace the outline of that last circle.

Video Tutorial
Watch the video tutorial to learn more how to draw the bird mandala and remember to subscribe and turn the notification bell on to be the first to watch my videos.