How to Sketch a Stunning Mandala Butterfly
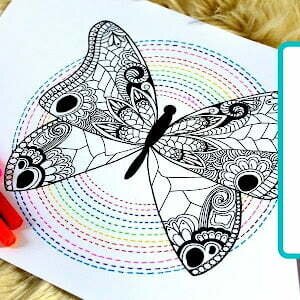
A mandala butterfly is the perfect blend of beauty, symmetry, and creativity. Combining the elegance of a butterfly with the intricate patterns of mandalas, this artwork is not just a drawing—it’s a journey of self-expression.
In this tutorial, you’ll learn how to create a stunning mandala butterfly, filled with delicate doodles and surrounded by colorful, circular lines. Placed at the center, the butterfly becomes the focal point, radiating harmony and balance through every detail.
Why choose a mandala butterfly? Because it’s more than just art—it’s a calming, meditative experience. The process of sketching, doodling, and coloring helps clear your mind and sparks your creativity. Whether you’re new to drawing or a seasoned artist, this step-by-step guide is designed to inspire and guide you with ease.
We’ll start with a simple butterfly outline, add unique doodles to its wings, and then build the mandala around it. You’ll also discover tips on choosing colors that make your design pop and bring your vision to life.
So, grab your pencils, pens, and favorite colors. Find a cozy spot, and let’s dive into the world of mandala art. By the end of this tutorial, you’ll have your very own gorgeous mandala butterfly—a piece of art that’s as relaxing to create as it is beautiful to look at. Let’s get started!
The list of materials you need to draw this mandala butterfly
You don’t need expensive or professional materials to create your mandala butterfly. In fact, as a beginner, it’s more important to focus on creativity than on tools. For example, you can start with a simple pencil, a pen, and basic colored pencils or markers. Additionally, if you don’t have special art supplies, don’t worry—practice is what truly matters. Furthermore, you can use regular paper, a notebook, or even scrap paper to get started. Therefore, this tutorial is perfect for using what you already have while still creating something beautiful. So, gather your materials, no matter how simple, and let’s begin this creative journey!
- Ruler
- Pencil
- Protractor
- 0.2 fine drawing pen
- Compass
- Colored Stabilo fine point 88
Instructions
This tutorial is based on a video available on my YouTube channel, where I demonstrate how to create a stunning mandala butterfly step by step. If you enjoy learning through visuals, the video offers even more details, helpful tips, and creative inspiration.
That being said, this article is here to assist you as you follow along with the video. It provides a written guide that you can reference at your own pace. Plus, it’s great for those moments when you want to double-check a step or explore the process in more depth.
Together, the video and this article make it easier to learn and create. So, whether you’re watching, reading, or doing both, you’ll have all the guidance you need to bring your mandala butterfly to life. Check out the video, grab your materials, and let’s get started!
Let’s start creating our mandala butterfly
- In the video, you will find detailed guidelines on how to trace the butterfly outline.
- Once this outline is traced, the butterfly will be decorated with a number of patterns.
- The first thing to do is to trace 2 inner lines in the upper wing and one inner line in the lower wing.
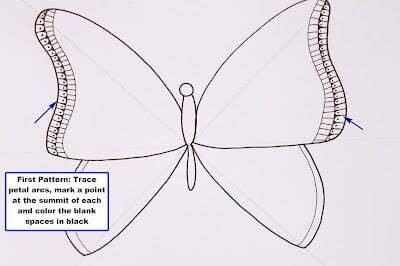
- Start by filling the first space with arc petals as shown in the picture below.
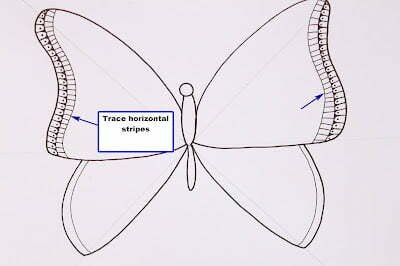
- Fill the second space with horizontal stripes as shown in the picture below.
- Draw a large circle, color it in black. Trace two thin outlines.

- Trace the pattern around the butterfly body. Check the pictures below:
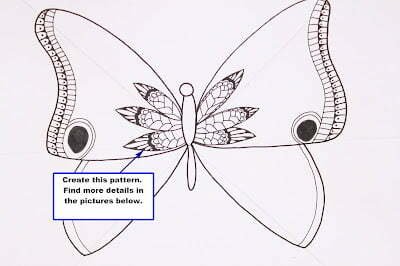
Details of the following Pattern:


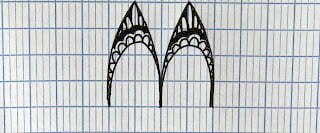
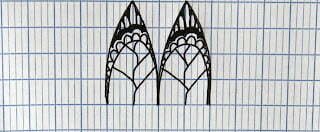
- Add an outline to the previously drawn pattern

- Draw a large Swirl and fill it with a Chevron pattern

- Trace another swirl, opposing the first one, and smaller. Color the empty space with black.

Video Tutorial
Your Creative Journey Begins Here
Completing your mandala butterfly is just the beginning of your creative journey. Each stroke, each pattern, and each color reflect your unique style and imagination. Take a moment to admire what you’ve created—it’s truly one of a kind.
As you continue to explore, try experimenting with new patterns, shapes, or even colors. Let your ideas flow freely and embrace the joy of creating something entirely your own.
If this tutorial sparked your creativity, there’s so much more waiting for you. Let your inspiration guide you, and don’t be afraid to make every design as unique as you are. Your artistic adventure has only just begun!