Good morning!!
Today’s tutorial includes a YouTube video and illustrated instructions. So you can read the article, look at the detailed illustrations, and watch the video to get a perfect idea of how to draw this beautiful Mandala flower.
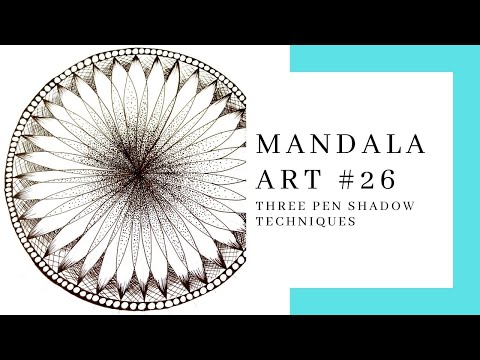
Adding shadows to your Mandala gives it an extremely beautiful finish and a professional look. In order to create shadows with an ink pen, there is a number of techniques. In this tutorial, I will show you three techniques, while, at the same time, showing you how to draw this beautiful Mandala flower. The three shadow techniques used are Stippling, hatching, and cross-hatching.
In order to get a great drawing experience, you have to have the proper tools for it and especially the proper pens. The thickness of the ink pen used here is 0.2 and I use this thickness a lot as it satisfies my goals in pen drawing.
Materials Needed:
- A4 Canson (white)
- Black drawing pen (0.3)
- Pencil
- Ruler
- Protractor
- Compass
Directions:
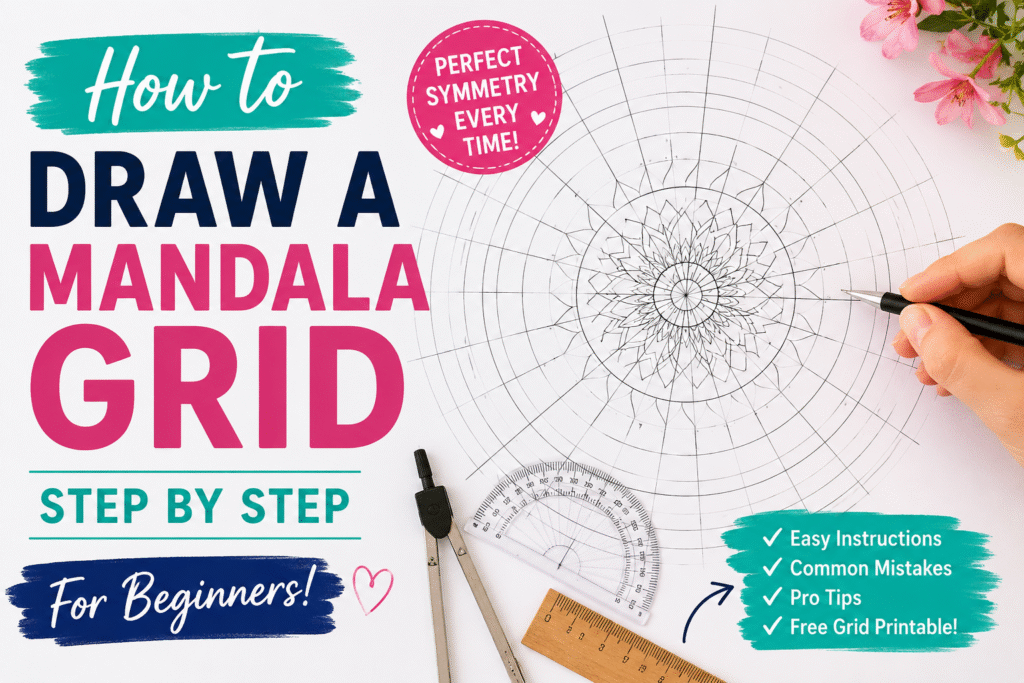
To get a nice finish you must build your Mandala on a grid, and in order to draw this grid, you must have in your mind the design you intend to create.
If you don’t have a particular idea of a Mandala, like me 🙂 -as I never know what I will be drawing and I leave myself be inspired by the moment- then trace a mandala grid with random measures and the design will come to you spontaneously.
What is a Mandala grid and why use it?
A mandala grid is a base structure composed of circles and lines that will help the artist achieve symmetry in an easy way. In order to trace the grid, you need a compass, a protractor, a pencil, and a ruler.
In this tutorial, the Mandala grid is simple and quick.
Start by tracing 2 circles (8.5 cm radius and 9 cm radius), then trace lines separated by 10 degrees.
How to trace the grid lines?
Draw a cross in the center of the circles. Place the protractor on the horizontal line, in a way that the black horizontal line of the protractor coincides with it.
Mark a point every 10 degrees; meaning put a mark on 10-20-30-40 etc. Then join each marked point with the center of the grid forming lines that go across all the circles.

Step 1:
Starting from the center of your grid, trace a curve from the center towards the nearest grid line on the right, as shown in the illustration. Repeat until your whole grid is filled with curves leaning towards the right.

Step 2:
Repeat step 1, but this time the curves must lean towards the left.

Step 3:
Stippling. The first shadow technique we will use is stippling. We create a shadow effect with dots.
The part we want to fill in the intersection between every 2 petals.
Start by filling this intersection with distanced dots, just a few. Then, the more you approach the center the more dots you will draw, until the part near the center becomes almost fully dark.

Step 4:
Retrace the outline of the 8.5 cm circle.

Step 5:
Fill the space between the 8.5 cm radius circle and the 9 cm radius circle with small circles.

Step 6:
Retrace the outer outline of your Mandala and fill the blank spaces between the small circles with black.

Step 7:
Hatching. In this step, trace lines at the summit of each petal to create a shadow. This technique is called hatching.

Step 8:
Cross-hatching. In this step, we will use the third shadow technique that is defined by tracing crossed lines and we refer to it as Cross hatching. In order to give depth to our Mandala, cross hatch the space between the summit of the petals as shown in the picture.

Video Tutorial
For more on how to draw this Mandala flower, watch the YouTube tutorial: