Twisted mandalas have a unique way of capturing attention. Although they are made from simple repeating shapes, the gentle rotation of each layer creates the illusion of movement, making the finished artwork look far more intricate than it really is. That beautiful twisting effect is exactly what makes this style one of my favorite types of mandalas to draw.
In this tutorial, I will guide you through the complete process of drawing this twisted mandala, one layer at a time. Every step builds naturally on the previous one, so you can follow along at your own pace without feeling overwhelmed. Even if some sections look complicated at first, you will soon discover that they are simply made from repeating patterns that become easier with every new ring.
Take your time, enjoy the process, and don’t focus only on the final result. One of the greatest joys of drawing mandalas is watching a blank page slowly transform into a detailed piece of art with every line you add. By the end of this tutorial, you’ll not only have completed this beautiful twisted mandala but also gain techniques that you can use to create many original mandalas of your own.
Why I Fell in Love with Twisted Mandalas
When I first discovered the world of mandalas, I was fascinated by the endless variety of patterns that could grow from a single center. However, one style immediately captured my attention more than any other: twisted mandalas. They seemed to move even though they were completely still. Every layer gently wrapped around the previous one, creating the illusion of rotation and giving the entire design a beautiful sense of motion.
Drawing my first twisted mandala was an unforgettable experience. I still remember the excitement of adding one ring after another without fully knowing how the finished artwork would look. Then, little by little, the illusion appeared. The simple petals began to twist, the layers started to flow into one another, and a flat drawing suddenly looked full of energy and movement. Watching that effect develop was incredibly satisfying.
Since then, twisted mandalas have become some of my favorite designs to create and teach. They may look complex at first glance, yet they are actually built from simple shapes repeated with patience and consistency. Once you understand the rhythm of the pattern, drawing them becomes both relaxing and rewarding.
In this tutorial, I will guide you through every step of this mandala exactly as I drew it. We will build it one layer at a time, and by the end, you will discover how a collection of simple petals and repeating patterns can transform into a beautifully twisted mandala that looks far more intricate than it really is.
What Is a Twisted Mandala?
A twisted mandala is a type of mandala that creates the illusion of movement. Although every pattern is carefully placed in a symmetrical layout, each new ring is drawn with a slight rotation or offset from the previous one. As the layers build outward, your eyes begin to perceive a gentle spiral, making the entire design appear as though it is twisting around its center.
One of the most fascinating things about a twisted mandala is that the effect is entirely optical. The paper remains perfectly flat, and the patterns themselves are often quite simple. Yet when those simple shapes are repeated with consistent spacing and a subtle change in direction, they combine to create a dynamic design that feels full of motion and energy.
Don’t let the finished artwork intimidate you. Many people assume that twisted mandalas are among the most difficult designs to draw, but they are actually built one layer at a time. Every ring follows the same principles of repetition, symmetry, and patience. Once you complete a few layers, you’ll notice that the design begins to flow naturally, and the twisting effect develops almost by itself.
In this tutorial, you’ll learn exactly how that illusion is created. Rather than simply copying a finished drawing, you’ll understand how each layer contributes to the overall movement. Once you master these techniques, you’ll be able to apply the same principles to create your own original twisted mandalas with confidence.
Materials You’ll Need
Before we begin, gather all the tools you’ll need for this tutorial. Having everything ready will help you stay focused and enjoy the drawing process without interruptions.
- Compass to draw the concentric circles that form the foundation of the mandala.
- Protractor to divide the circle into equal sections with precision.
- Ruler to draw the radial guidelines from the center to the outer edge.
- Pencil for constructing the mandala grid.
- Eraser to remove the grid once the ink has dried.
- Four 0.4 mm fine drawing pens in different colors. For this tutorial, I used red, orange, yellow, and blue, but you can choose any four colors you like. Using different colors makes it much easier to distinguish the overlapping layers and enhances the beautiful twisting effect of the finished mandala.
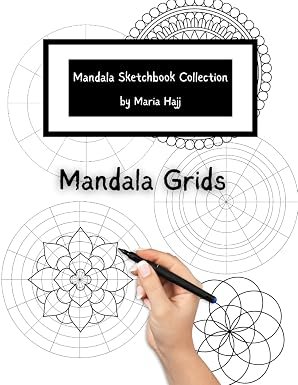
If you enjoy drawing mandalas but prefer to skip the time spent creating the construction grid, you can also use one of my Mandala Grid Sketchbooks. Each page already includes professionally designed mandala grids, allowing you to start drawing your patterns immediately. They are perfect for practicing new designs, experimenting with different pattern combinations, or simply spending more time creating and less time measuring.
Before You Start Drawing
Before we begin, I’d like to share a few thoughts about the way I teach mandala drawing. You may notice that my approach is different from many other tutorials, but it has helped hundreds of my students become more confident and enjoy the process much more.
Unlike many artists, I encourage my students to draw directly with their fine liners instead of sketching the entire mandala in pencil first. Of course, you’ll need a pencil to construct the mandala grid, but once the grid is ready, I recommend putting the pencil aside and starting your patterns with ink.
Why I Encourage Drawing Directly with a Pen
Over the years, I’ve found that the first line you draw is often your most natural one. From my own experience as an artist, I feel that it carries your rhythm, your confidence, and your personality. When you spend time tracing pencil lines with a pen, that fresh, spontaneous feeling can begin to fade. For many students, the process becomes repetitive, and some of the excitement disappears before the mandala is even finished.
Drawing directly with ink also changes the way you approach your artwork. Instead of worrying about creating the perfect line, you learn to trust your hand and enjoy each stroke as it happens. This mindset makes the entire drawing experience more relaxing and rewarding.
Every Mandala Tells a Different Story
Another reason I love drawing directly with a pen is that it teaches one of the most important lessons in mandala art: mistakes simply don’t matter. Every unexpected line is an opportunity to invent a new pattern, add another detail, or transform the design into something even more interesting. Some of my favorite motifs were created because I made what first looked like a mistake.
This is also why no two mandalas are ever truly the same. Even when a group of students follows the exact same tutorial, each finished piece develops its own character. I’ve witnessed this countless times during my workshops. Everyone draws the same circles, the same petals, and the same patterns, yet every mandala looks unique by the end.
I believe this happens because every person draws lines differently. Some lines feel soft and flowing, while others appear bold and energetic. A patient hand produces different strokes than one that is rushing. Those subtle differences become part of the artwork, giving every mandala its own personality and making each finished piece a reflection of the artist who created it.
So, don’t aim for perfection. Focus on enjoying the process, trust your hand, and allow your mandala to become uniquely yours. The beauty of mandala drawing isn’t found in perfectly identical lines. It’s found in the individuality that naturally appears with every stroke.
Mandala Drawing and coloring are very beneficial to one’s physical and mental health. A mandala was first created by Buddha who was inspired by the universe and its circular shape and created this drawing method to help monks enter in a state of mindfulness in order to meditate.
At the time, drawing a Mandala included a number of religious symbols and meanings, but today the mandala is geometrical and we use few shapes inspired by the nature like peals and leaves.
Building the Mandala Grid
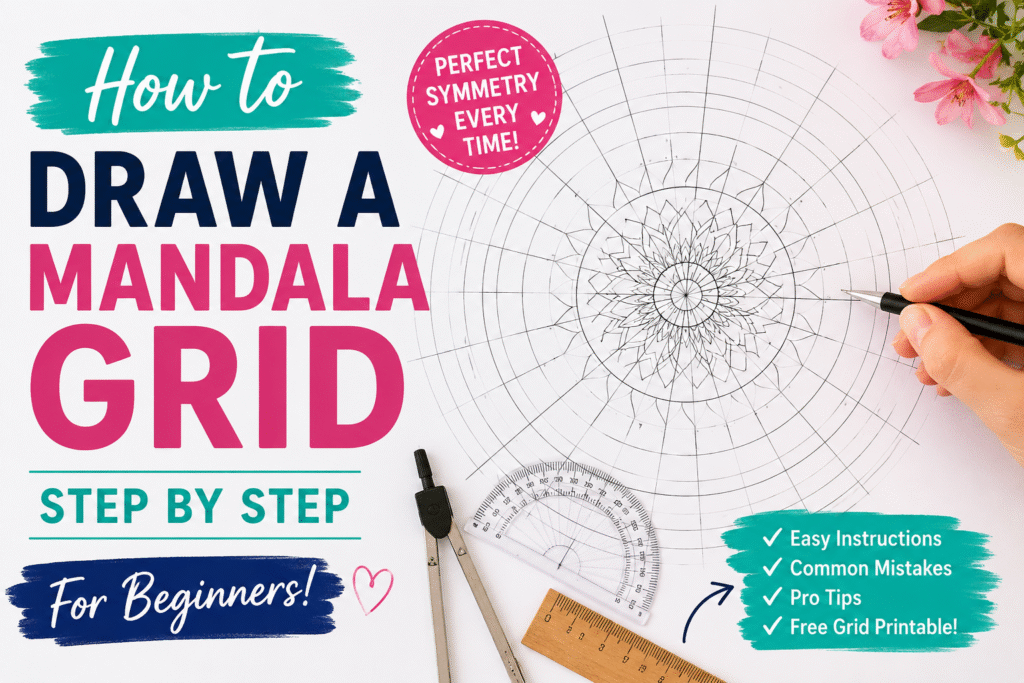
Every beautiful mandala begins with a solid foundation, and this twisted mandala is no exception. Before drawing the decorative patterns, we’ll first create a precise construction grid. To learn more about mandala grids you can read my article.
This grid serves as the framework for the entire design, helping every layer stay balanced and allowing the twisting effect to emerge naturally as the mandala develops.
For this tutorial, the grid is made up of 10 concentric circles. Starting from the center, draw circles with the following radii:
- 1 cm
- 2 cm
- 3 cm
- 4 cm
- 5 cm
- 6 cm
- 7 cm
- 8 cm
- 9 cm
- 10 cm
Keeping a consistent spacing of 1 centimeter between each circle creates nine evenly sized rings. This gives you enough space to build detailed patterns while maintaining a harmonious composition throughout the mandala.
Next, use your protractor to divide the circle into 16 equal sections. Place a mark every 22.5 degrees around the outer circle. Then, using your ruler, draw straight lines from the center through each mark until they reach the outermost circle. These guidelines will help you position every petal and decorative element with perfect symmetry.
Save Time with My Mandala Grid Sketchbook
If you prefer to skip the measuring process, you can use my Mandala Grid Sketchbook instead. For this tutorial, I used Grid C from the sketchbook as the starting point. The only modification I made was adding two additional concentric circles with radii of 9 cm and 10 cm, allowing enough space to complete the outer layers of this twisted mandala. Using the sketchbook lets you begin drawing almost immediately while still following this tutorial exactly.
A Strong Grid Makes Every Step Easier
Although drawing the grid may seem like the least exciting part of the process, it is one of the most important. A carefully constructed grid makes every step that follows much easier because you’ll spend less time checking measurements and more time enjoying the creative process.
Don’t worry if your measurements aren’t mathematically perfect. Tiny variations are rarely noticeable in the finished artwork. What matters most is maintaining an overall sense of balance and rhythm. Once your grid is complete, you’ll have everything you need to transform a few simple circles and guidelines into a beautiful twisted mandala.
Drawing the Twisted Mandala
How to Arrange the Colors
Before you start drawing, it’s important to understand how the colors are arranged. The twisting effect doesn’t happen by chance. It comes from placing the same colors in a slightly different position with every new ring.
For example, if you draw a red petal in the first ring, don’t draw the next red petal directly above it in the second ring. Instead, move it slightly to the right. Then, in the third ring, move it slightly to the right again. Continue doing this for every new layer.
Repeat the same idea with the other colors. Every time you begin a new ring, shift each color by one section in the same direction. This small offset is what creates the illusion that the petals are twisting around the center of the mandala.
Don’t worry if you can’t see the effect during the first few steps. As more layers are added, the colors begin to line up diagonally, and the beautiful twisting illusion gradually appears. By the time you finish the mandala, you’ll clearly see the movement created by this simple color arrangement.
Step 1: Draw the First Ring of Petals
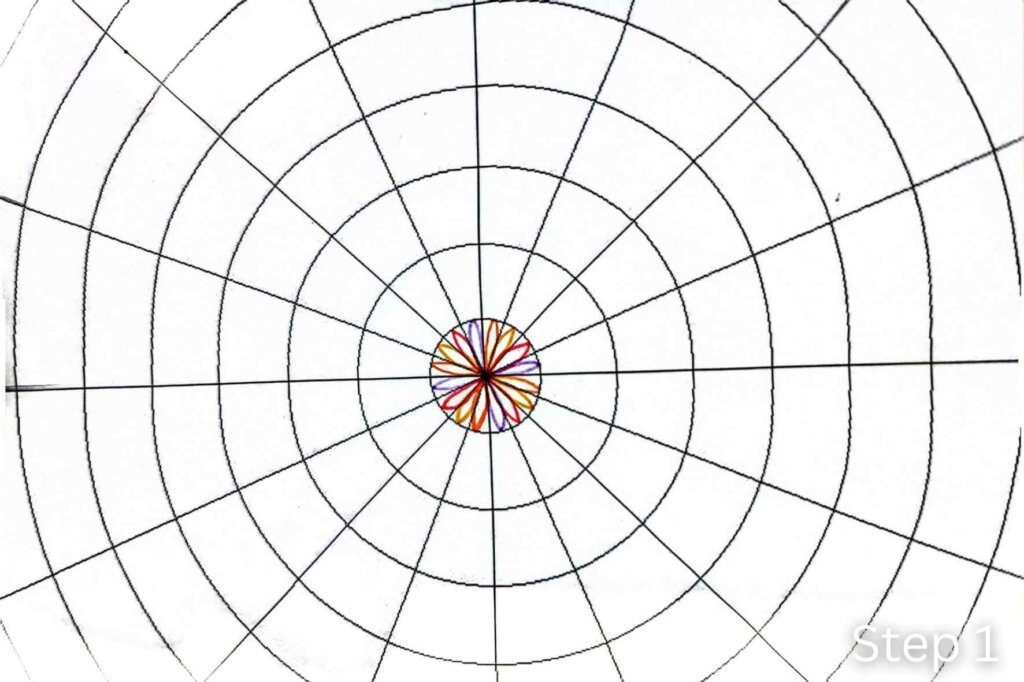
We begin at the very center of the mandala by working inside the smallest circle. This first ring will create the foundation for every pattern that follows, so take your time and draw each petal carefully.
Starting at the center point, draw a long, narrow petal that extends to the edge of the first circle. The petal should be slightly pointed at the tip and gently curved along both sides. Once the first petal is complete, repeat the same shape in every section of the grid until you have 16 identical petals surrounding the center.
For this tutorial, I alternated red, orange, yellow, and purple pens as I moved around the circle. You can follow the same color sequence or choose your own combination. Using different colors from the beginning will make the twisting effect much more noticeable as the mandala grows.
Remember to keep the width and height of the petals as consistent as possible. However, don’t worry if they are not perfectly identical. Small differences give the mandala its unique character, and they often become impossible to notice once the remaining layers are added.
With the first ring complete, you’ve established the center of your twisted mandala and are ready to build outward in the next step.
Step 2: Add Depth with Stippling
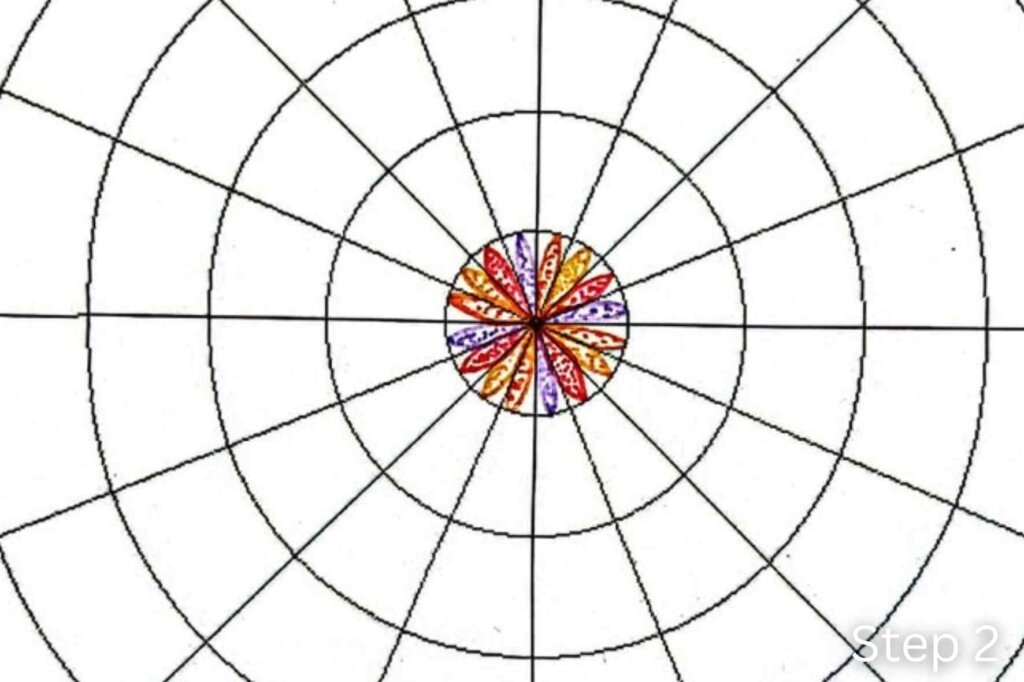
With the first ring of petals complete, it’s time to give them more depth and visual interest. In this step, we’ll use a technique called stippling, which creates texture and shading by drawing small dots instead of solid lines.
Inside each petal, draw a smaller leaf-shaped outline that follows the contour of the outer petal, leaving a narrow border around the edge. Then, fill the inside of this smaller shape with tiny dots. Place the dots close together near the base of the petal and gradually spread them farther apart as you move toward the tip. This subtle change in density creates the illusion of depth while keeping the design light and elegant.
Take your time when adding the dots. Stippling is a relaxing technique that rewards patience. There’s no need to count the dots or make them perfectly even. The goal is to create a smooth visual texture rather than a perfectly uniform pattern.
Once you’ve finished stippling all sixteen petals, the center of your mandala will immediately appear more dimensional. Although this is a small detail, it adds richness to the design and prepares the eye for the more intricate patterns that will follow.
Step 3: Draw the Second Ring of Petals
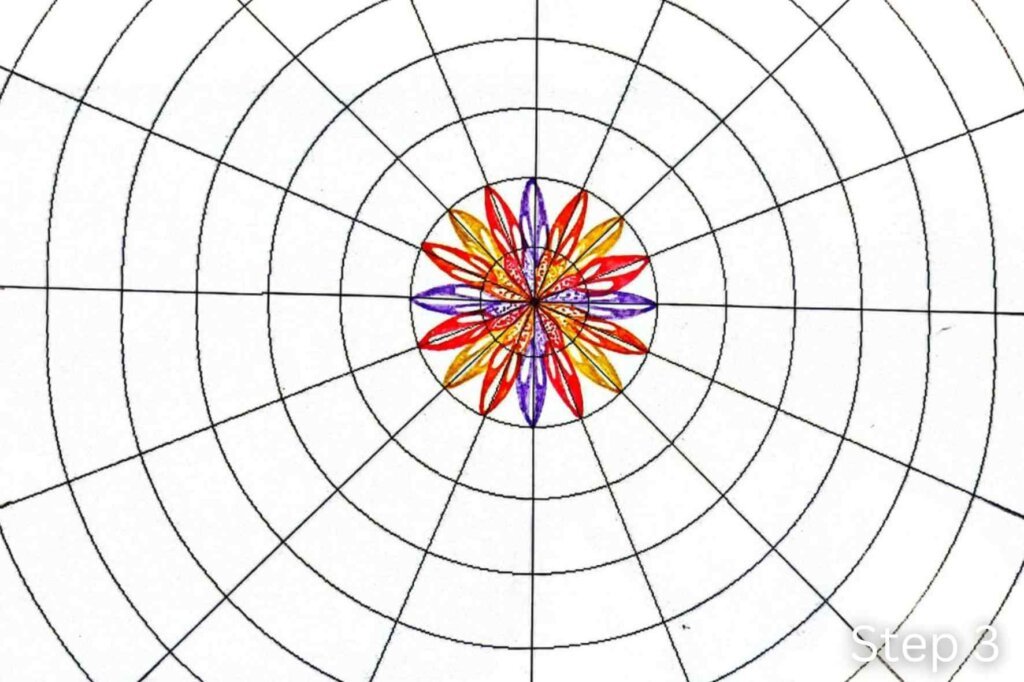
In this step, we’ll begin expanding the mandala beyond the center by adding a second ring of long, elegant petals. These petals extend into the second circle and give the flower a fuller appearance while maintaining the symmetry of the design.
Draw a long, pointed petal in each section of the grid, starting from the center and extending to the edge of the second circle. Keep the petals narrow with gently curved sides and pointed tips. Continue alternating your pen colors using the same sequence as in the first ring to maintain balance throughout the mandala.
Once all the petals are complete, decorate the inside of each one with three reversed teardrops. Draw one large reversed teardrop in the center of the petal, then add one smaller reversed teardrop on each side. Try to keep the spacing even so the motif looks centered inside the petal.
Finally, color the remaining spaces around the teardrops using the same color as the petal itself. This creates a beautiful contrast, allowing the white teardrops to stand out while adding more depth and elegance to the design.
Repeat this process for all sixteen petals before moving on to the next layer.
Step 4: Draw the Third Ring of Petals
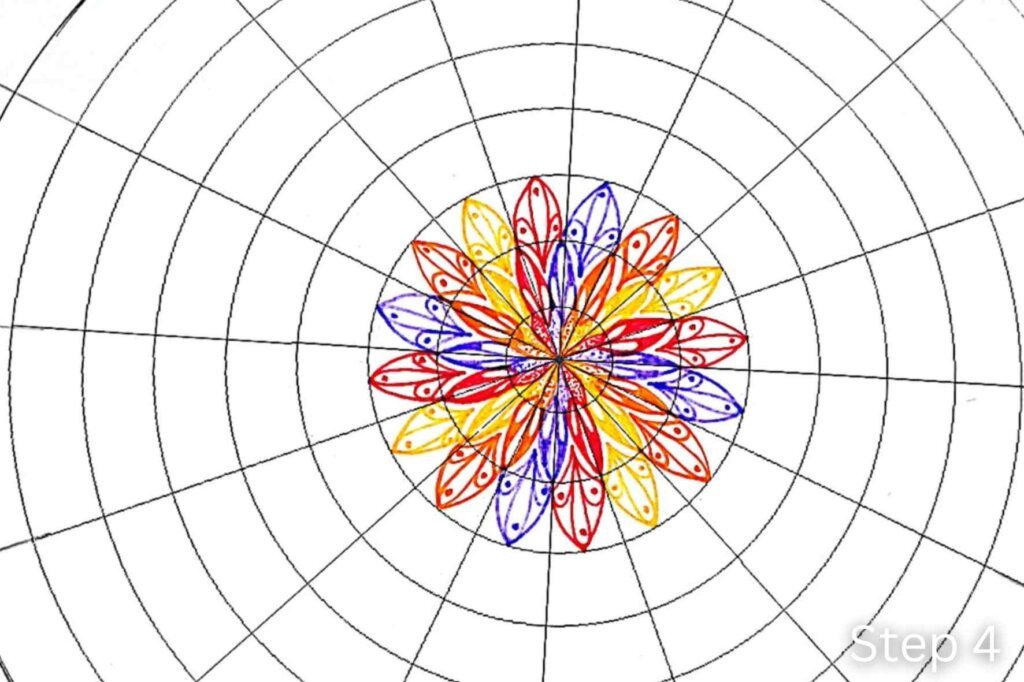
Now we’ll continue building the flower by adding a third ring of petals. These petals extend from the center to the edge of the third circle, making the mandala appear larger while introducing another decorative pattern.
Draw a long, slender petal in every section of the grid, extending each one to the edge of the third circle. Keep the petals evenly spaced with gently curved sides and pointed tips. Continue following the same color sequence used in the previous layers to maintain a harmonious balance throughout the mandala.
Inside each petal, draw three reversed teardrops. Start with one large reversed teardrop in the center, then add one smaller reversed teardrop on each side. Try to keep all three shapes parallel to the outer edge of the petal so they follow its natural curve.
To complete the pattern, place a small dot above the tip of each reversed teardrop. These tiny dots add an elegant finishing touch while creating more visual rhythm within the design. Because every petal contains the same motif, the eye naturally follows the repetition, making the mandala feel more unified.
Repeat this decoration in all sixteen petals before moving on to the next step. At this stage, your mandala is beginning to develop the layered appearance that will eventually create the beautiful twisted effect.
Step 5: Repeat the Pattern to Create the Fourth Ring
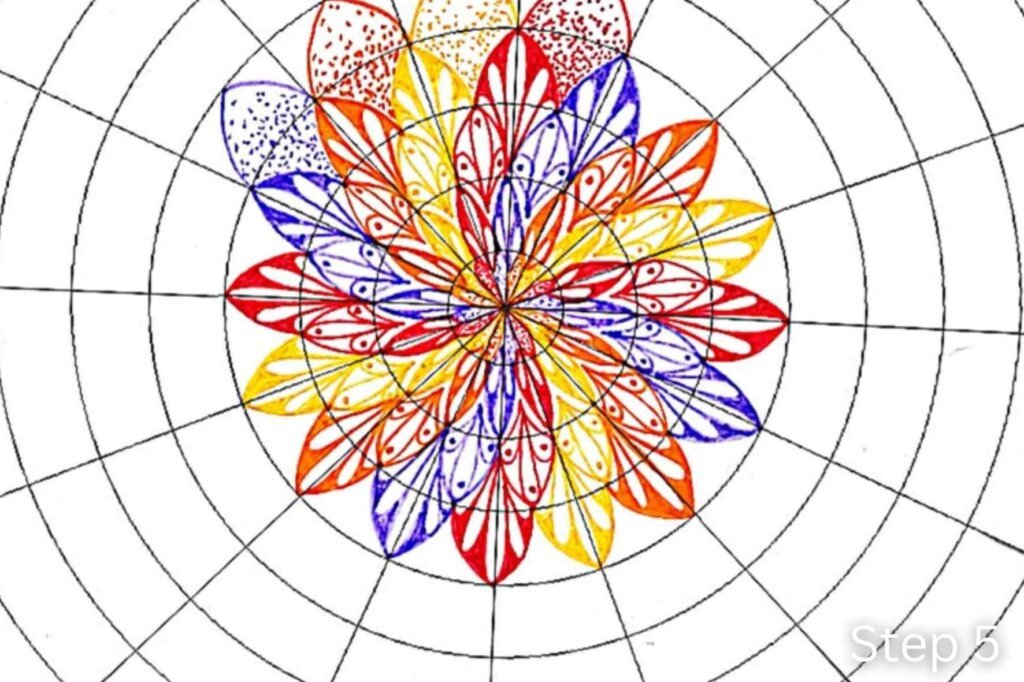
Now we’ll repeat the same decorative pattern used in Step 3, but this time we’ll extend the petals to the fourth circle. Repeating a familiar motif helps create rhythm within the mandala while making the drawing process feel more natural and relaxing.
Draw a new ring of long, pointed petals, extending each one from the center to the edge of the fourth circle. Continue following the same color sequence you’ve used from the beginning of the tutorial. This consistent color rotation will become an important part of the twisting effect as the mandala continues to grow.
Inside every petal, draw one large reversed teardrop in the center and two smaller reversed teardrops on either side, just as you did in Step 3. Then, color the blank space.
Because you’ve already practiced this motif once, you’ll probably notice that this layer comes together much more quickly. Repeating patterns is one of the most enjoyable aspects of mandala drawing. Instead of becoming repetitive, the process often becomes meditative as your hand naturally follows the rhythm of the design.
Once you’ve completed this ring, your mandala will begin to show a stronger sense of movement and layering, bringing you one step closer to the beautiful twisted effect.
Step 6: Draw Another Ring of Petals with Stippling
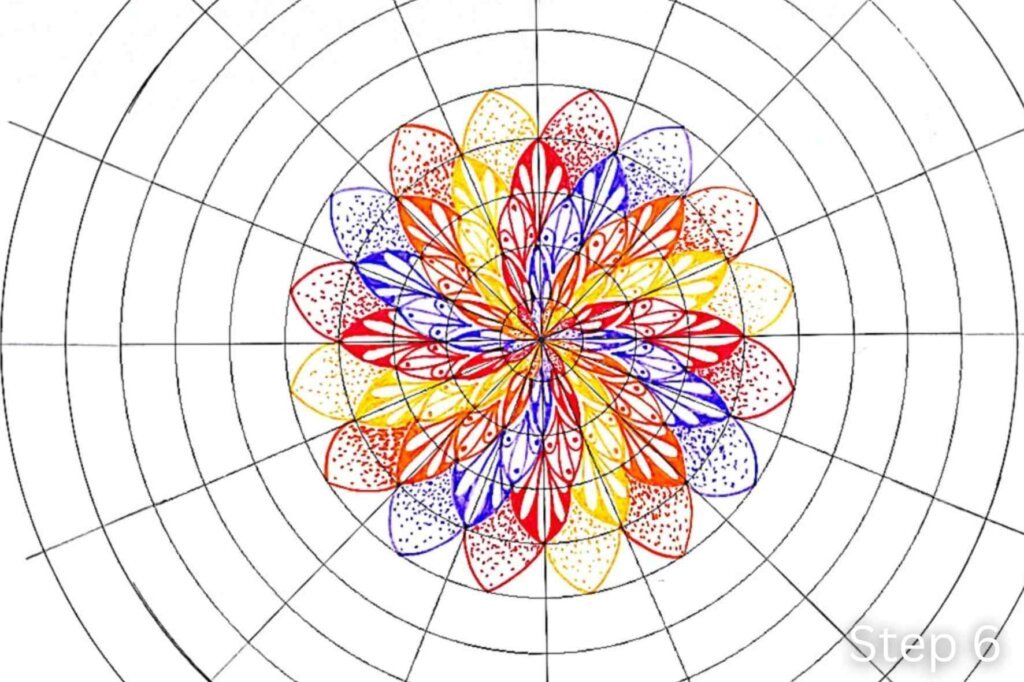
We’ll now add another ring of petals, extending them to the fifth circle. Although these petals appear slightly wider than the previous ones, they are drawn exactly the same way. The only difference is that the distance between the radial guidelines becomes larger as we move farther from the center, naturally making each petal broader.
Draw one pointed petal in every section of the grid, extending each one to the edge of the fifth circle. Keep the sides gently curved and the tips pointed, just as you have done in the previous layers. Continue following the same color sequence to preserve the balance of the design.
Once all the petals are complete, decorate them using the stippling technique. Fill each petal with small dots, placing them more densely near the base and gradually spacing them farther apart toward the tip. This gradual transition creates a soft sense of depth while adding texture without overwhelming the pattern.
As you repeat this process around the mandala, you’ll begin to notice how the larger petals create more breathing space between the intricate inner details. This balance between dense and open areas is one of the elements that makes the finished mandala feel harmonious and visually appealing.
Step 7: Repeat the Previous Pattern to Build the Next Ring
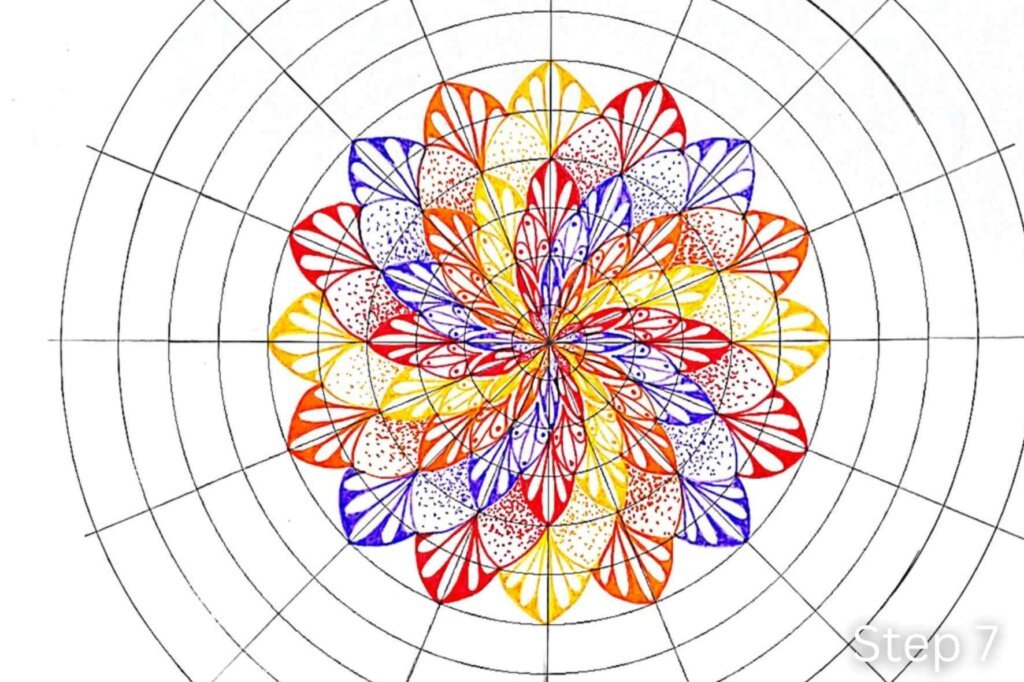
In this step, we’ll repeat the same petal design from Step 5, extending it one ring farther to the sixth circle. As you’ve probably noticed by now, repeating patterns is one of the key principles of mandala drawing. Each new layer reinforces the harmony of the design while gradually increasing its complexity.
Draw a new ring of pointed petals, extending each one to the edge of the sixth circle. Because the distance between the radial guidelines continues to increase, the petals will naturally become wider than those in the previous rings. Simply follow the grid and let the petal shape develop naturally.
Inside each petal, draw one large reversed teardrop in the center and two smaller reversed teardrops on either side, just as you did in Step 5. Then, color the blank space.
Continue alternating your colors in the same sequence throughout the entire ring. This consistent repetition of both colors and patterns is what gradually creates the beautiful rhythm and movement that make twisted mandalas so captivating.
Once you’ve completed this layer, you’ll notice that the flower has become fuller, and the alternating textured rings begin to create the illusion of depth and gentle rotation.
Step 8: Draw Another Ring of Petals
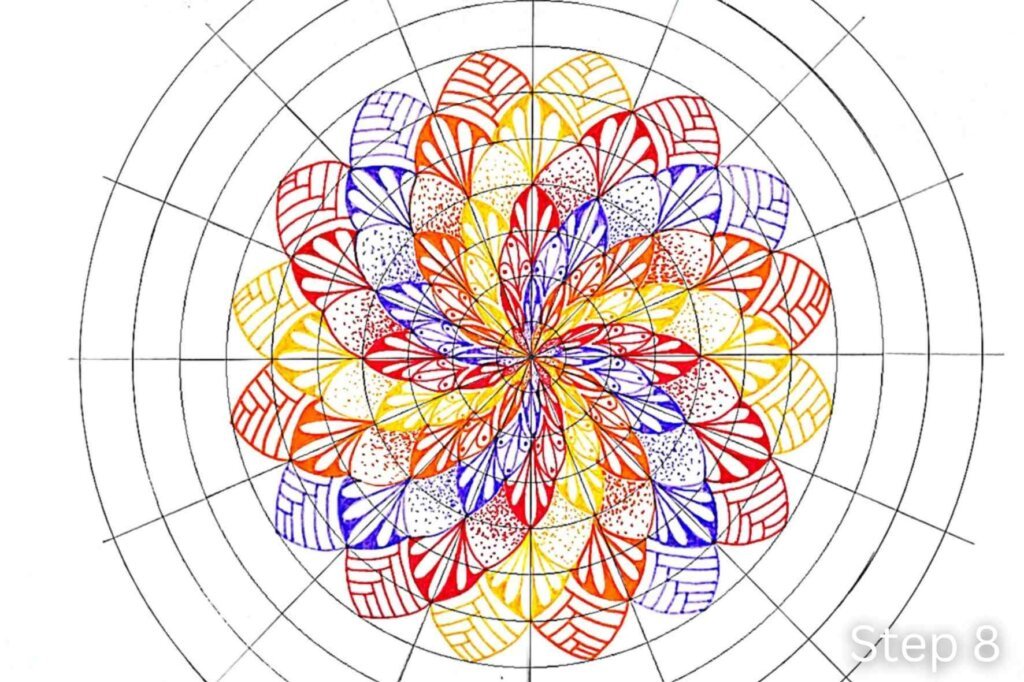
In this step, we’ll continue expanding the mandala by drawing another ring of petals, extending them to the seventh circle. By now, you’ll notice that the petals naturally become wider as you move away from the center because the space between the radial guidelines continues to increase.
Draw one petal in every section of the grid, extending each one to the edge of the seventh circle. Continue following the same color sequence you’ve used throughout the tutorial to maintain the twisting effect.
To decorate the petals, begin by drawing a double curved line along the left side of the petal, following its contour. Next, draw another double curved line on the right side. Continue alternating from left to right, adding one double line at a time until the entire petal is filled. Each new pair of lines should follow the shape of the previous one, gradually filling the petal with evenly spaced bands.
This alternating pattern creates a beautiful sense of rhythm and movement while adding another unique texture to your mandala. Repeat the same design in every petal until the entire ring is complete.
Step 9: Repeat the Reversed Teardrop Pattern
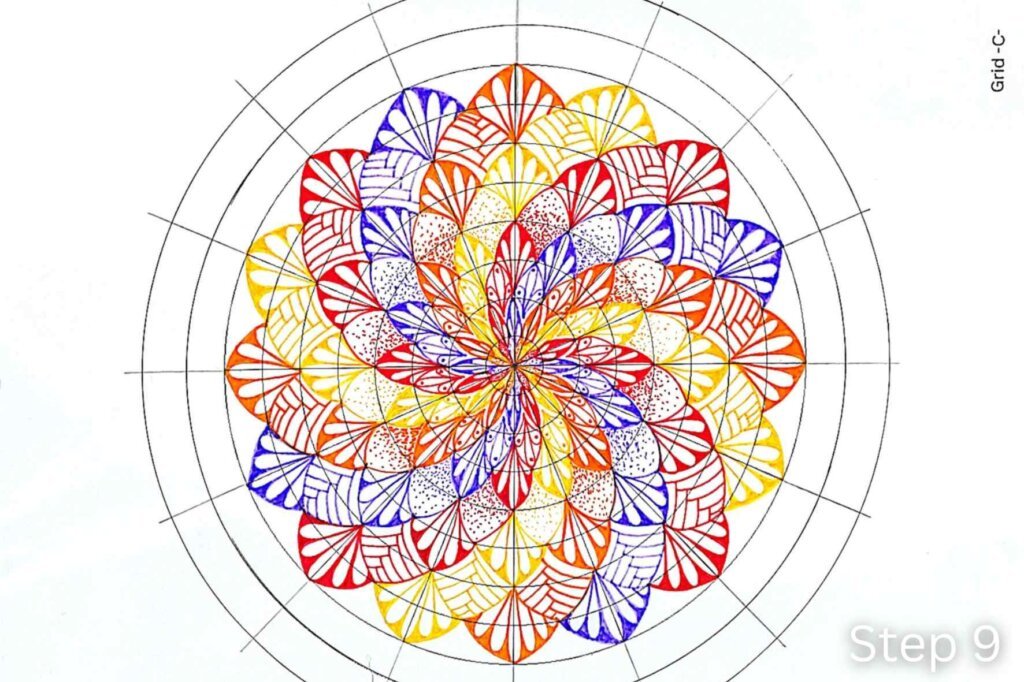
In this step, we’ll repeat the same decorative pattern used in Step 5, extending it one ring farther to the eighth circle. By repeating familiar motifs, the mandala develops a balanced rhythm while gradually becoming more intricate.
Draw a new ring of petals, extending each one to the edge of the eighth circle. Continue following the same color sequence you’ve used from the beginning of the tutorial to preserve the twisting effect.
Inside each petal, draw one large reversed teardrop in the center and two smaller reversed teardrops, one on each side. Keep the three shapes evenly spaced so they follow the natural contour of the petal.
Once the teardrops are complete, color the remaining spaces inside the petal with the same color as the petal itself. Leaving the teardrops white creates a beautiful contrast that makes the pattern stand out while adding depth to the design.
Repeat this motif all the way around the mandala until the entire ring is complete. At this stage, the alternating decorative patterns work together to strengthen the twisting illusion and give the mandala an elegant, layered appearance.
Step 10: Draw a New Petal Pattern
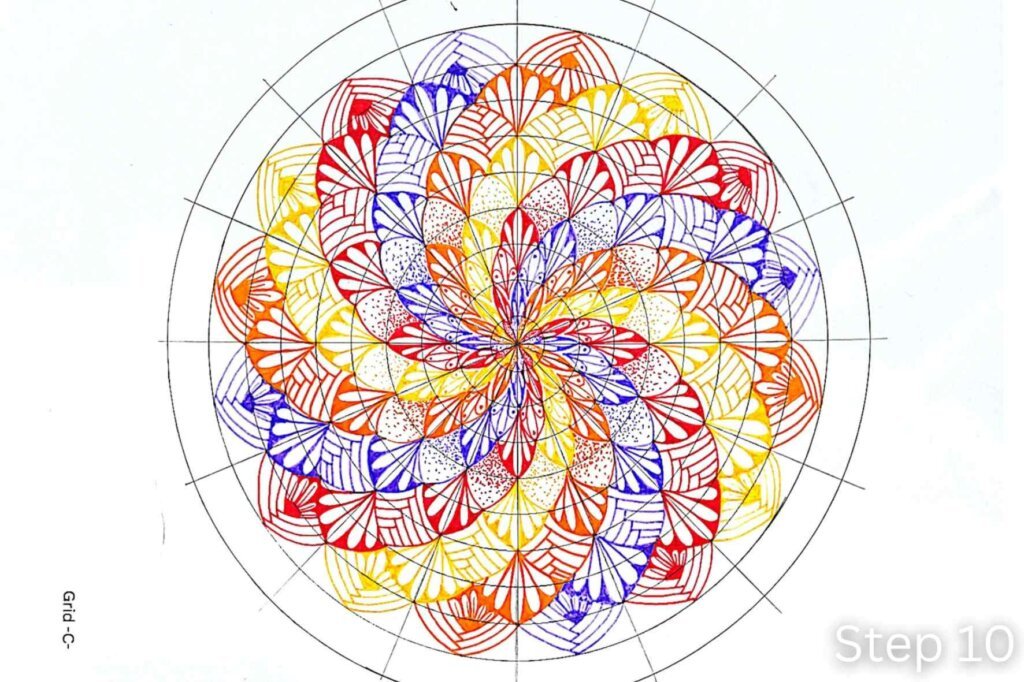
We’ll now add another ring of petals, extending them to the ninth circle. This layer introduces a completely new decorative motif that combines flowing lines with a floral element, giving the outer section of the mandala even more character.
Draw one petal in every section of the grid, extending each one to the edge of the ninth circle. Continue using the same color sequence you’ve followed throughout the tutorial so the twisting effect remains consistent.
To decorate each petal, begin at the tip of the petal. Draw a double outline along the left side, following the contour of the petal. Next, draw another double outline along the right side. Repeat this alternating movement—left, then right—until you have drawn three double outlines on each side.
Once these outlines are complete, you’ll notice a small empty space remaining near the base of the petal. Fill this space by drawing half of a daisy flower, allowing its petals to spread naturally toward the center of the mandala.
Finally, color all the remaining blank spaces around the daisy petals using the same color as the petal. Leaving the daisy petals white creates a beautiful contrast and makes this new motif stand out from the previous layers.
Repeat this design in every petal around the mandala. This combination of alternating outlines and the half-daisy motif creates a rich, elegant texture that adds another level of complexity to the twisted mandala.
Step 11: Complete the Final Ring with Stippling
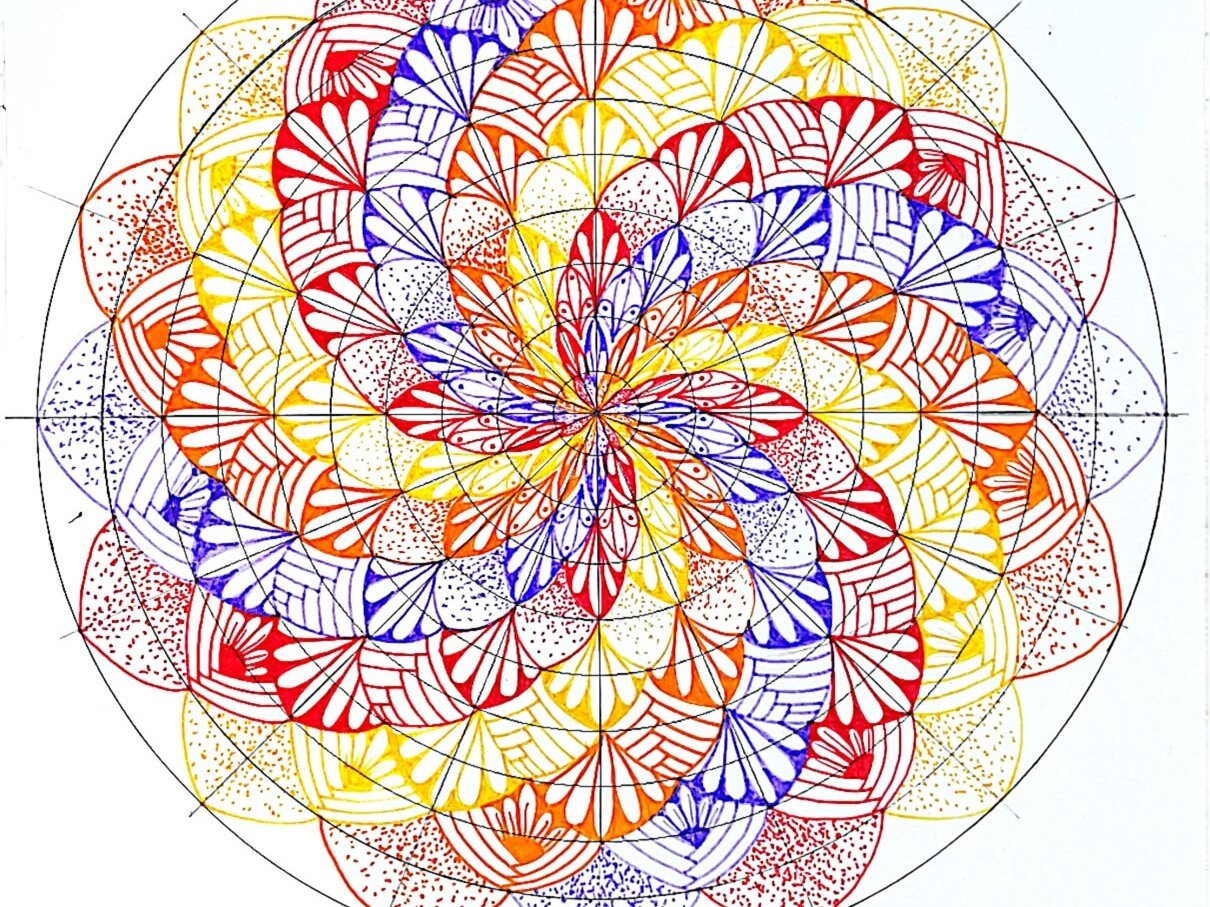
Congratulations! You’ve reached the final step of this twisted mandala. In this last layer, we’ll complete the design by adding one final ring of petals, extending them to the outermost circle of the grid.
Draw one petal in every section of the grid, allowing each one to reach the outer circle. By now, you’ll notice that these petals are the widest in the entire mandala because the distance between the radial guidelines is greatest at the edge of the design. Simply follow the grid, and the petal shape will naturally become larger.
Once all the petals are complete, decorate them using the stippling technique. Fill each petal with small dots, placing them closer together near the base and gradually spacing them farther apart toward the tip. This subtle variation creates texture and gives the outer ring a soft, elegant finish that complements the rest of the mandala.
Repeat this process around the entire mandala until every petal is complete. The stippled outer layer beautifully frames the design while balancing the more detailed patterns found in the inner rings.
Take a moment to admire your finished artwork. Although every student has followed the same steps, your mandala is uniquely yours. The small variations in your lines, your hand movements, and your choice of colors make this piece unlike any other. That’s one of the most rewarding aspects of mandala drawing—every finished design is a reflection of the artist who created it.