Be the First to Complete This Amazing Mandala Drawing
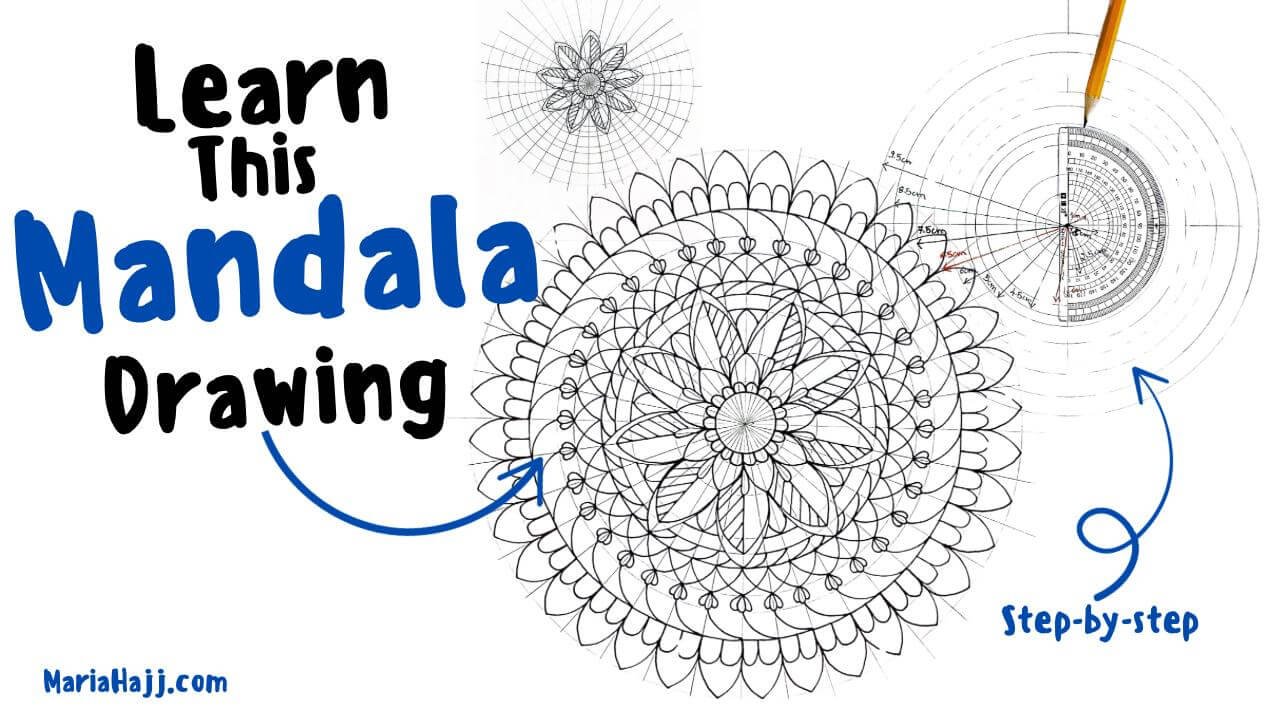
Mandala drawing is more than just creating beautiful patterns; it’s a journey into mindfulness, creativity, and inner peace. Whether you’re a beginner or experienced, this tutorial will guide you step-by-step to complete an amazing mandala.
First, let’s explore what makes mandala drawing so special. It’s not just about shapes and lines; it’s about balance and harmony. Additionally, mandalas represent the universe, symbolizing unity and the endless cycle of life. As you draw, you’ll feel a calming, meditative effect, helping you focus and relax.
Moreover, this isn’t just any mandala—it’s a challenge. Can you be the first to complete it? This exciting task encourages you to dive into intricate designs and showcase your artistic flair. Not only will you develop drawing skills, but you’ll also discover a new way to express emotions.
Furthermore, mandala drawing helps improve concentration, reduce stress, and boost creativity. With every line and curve, you’ll find yourself more connected to the present moment. Plus, the satisfaction of seeing your finished artwork is incredibly rewarding.
Throughout this tutorial, you’ll learn simple techniques to create stunning patterns. Step by step, you’ll see how easy and fun mandala drawing can be. Also, we’ll share tips to enhance your designs and make them uniquely yours.
So, grab your tools, clear your mind, and get ready. This is your chance to embrace creativity, find peace, and complete an extraordinary mandala. Are you ready to be the first?
The Essence of Mandala Drawing
Mandala drawing is more than just creating patterns; it’s a meditative practice that connects the mind, body, and spirit. Moreover, it symbolizes harmony, balance, and the universe’s infinite nature, making it a powerful tool for self-reflection and inner peace.
At its core, it represents the cycle of life, with shapes radiating from the center to symbolize growth and unity. Additionally, the repetitive patterns encourage focus and mindfulness, helping to calm the mind and reduce stress.
Furthermore, mandala drawing allows for creative expression without the pressure of perfection. Every line and curve flow naturally, reflecting your emotions. Even if you’re not an artist, the process feels soothing, offering a sense of accomplishment with each completed section.
In addition to its calming effects, mandala drawing helps improve concentration. As you focus on details, you become present, letting go of distractions and worries. This mindful practice creates a peaceful mental space, perfect for relaxation and reflection.
Moreover, mandalas have spiritual significance in many cultures. They are often used in meditation practices to center thoughts and promote emotional healing. Drawing them can be a personal journey, revealing insights about your feelings and inner world.
Besides promoting mindfulness, mandala drawing boosts creativity. The freedom to explore shapes, patterns, and colors opens new artistic possibilities. You can experiment without judgment, discovering unique styles that reflect your personality.
Ultimately, it is not just about art; it’s a transformative experience. It nurtures the soul, calms the mind, and awakens creativity. So, whether for relaxation, meditation, or fun, embrace mandala drawing as a beautiful path to self-discovery.
The Materials Needed to Complete This Mandala Drawing
The materials needed in this tutorial are the following:
- a white A4 paper or cardboard
- sharp pencil
- compass
- protractor
- 30 cm long ruler
- eraser
- fine drawing pen of your choice
However, keep in mind that you don’t need any professional materials. Just grab what you have around you.
1- Trace the Mandala Grid
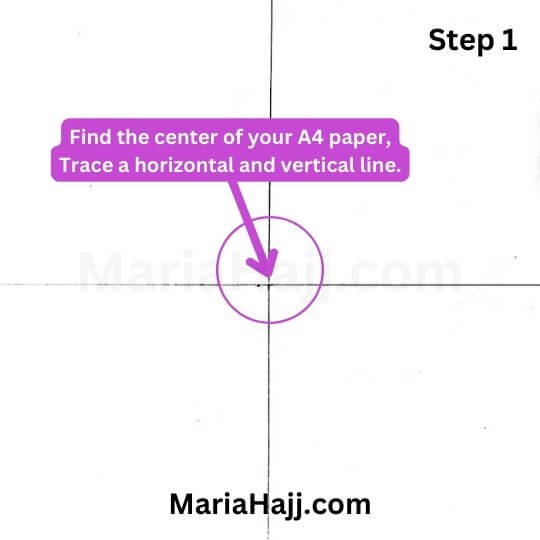
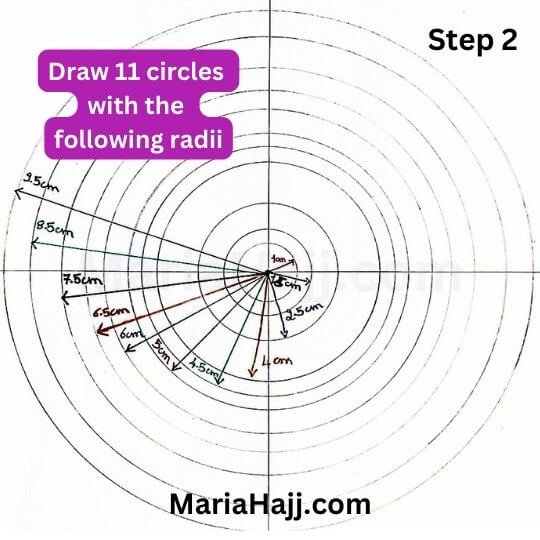
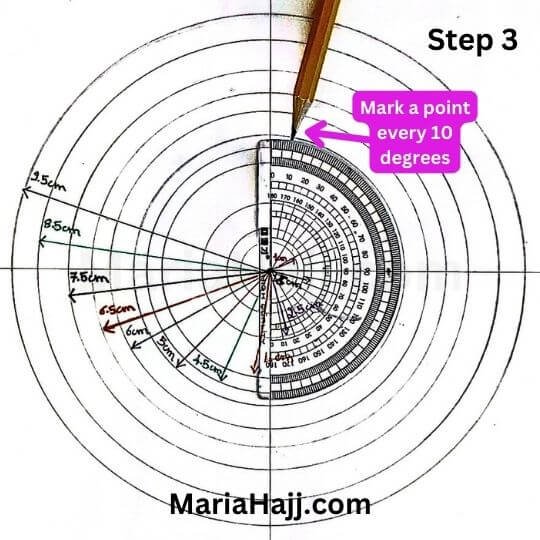
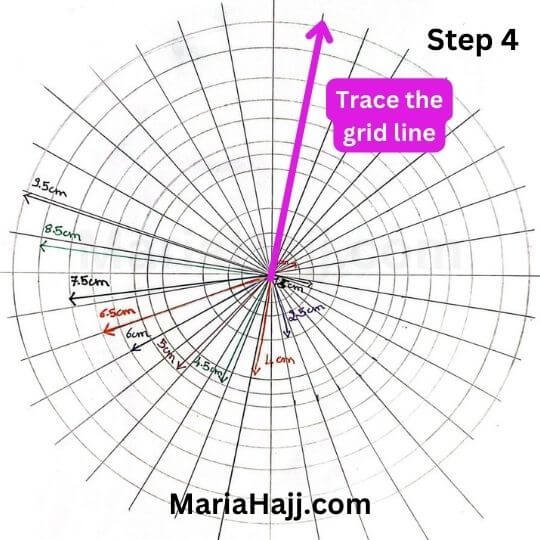
2- Fill the lines with easy mandala patterns
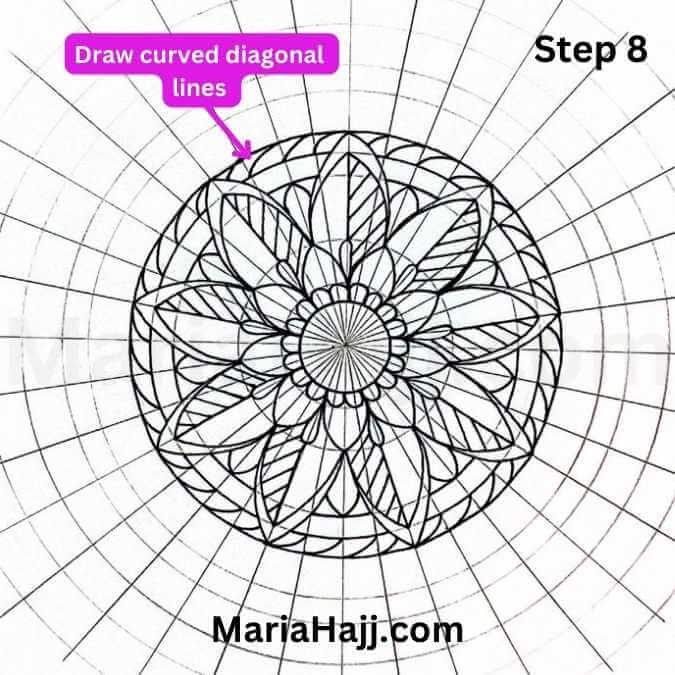
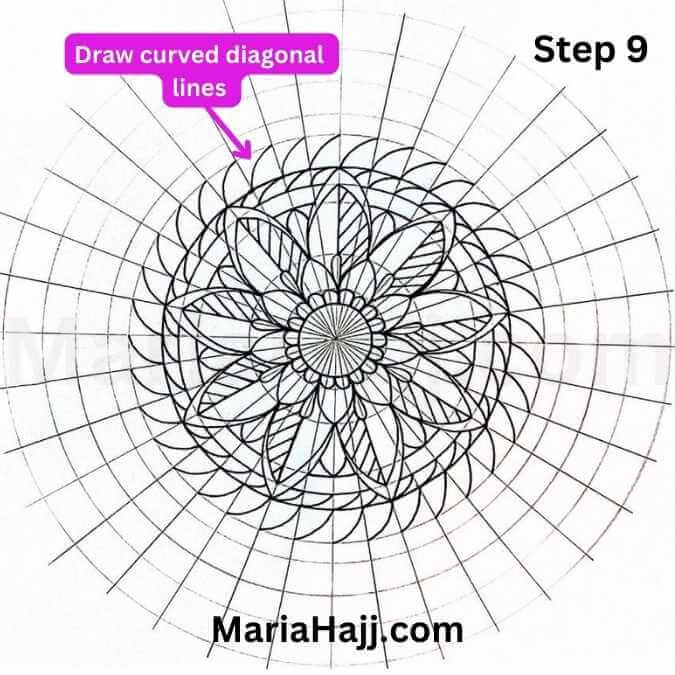
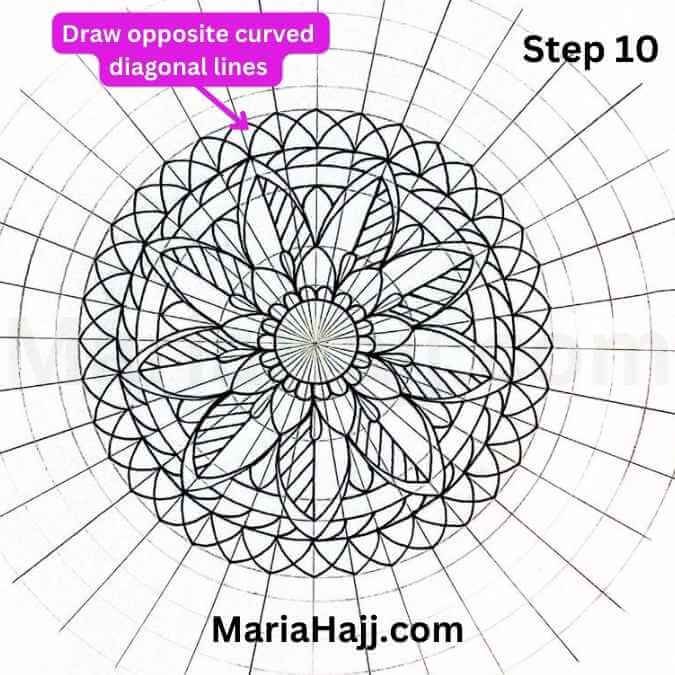
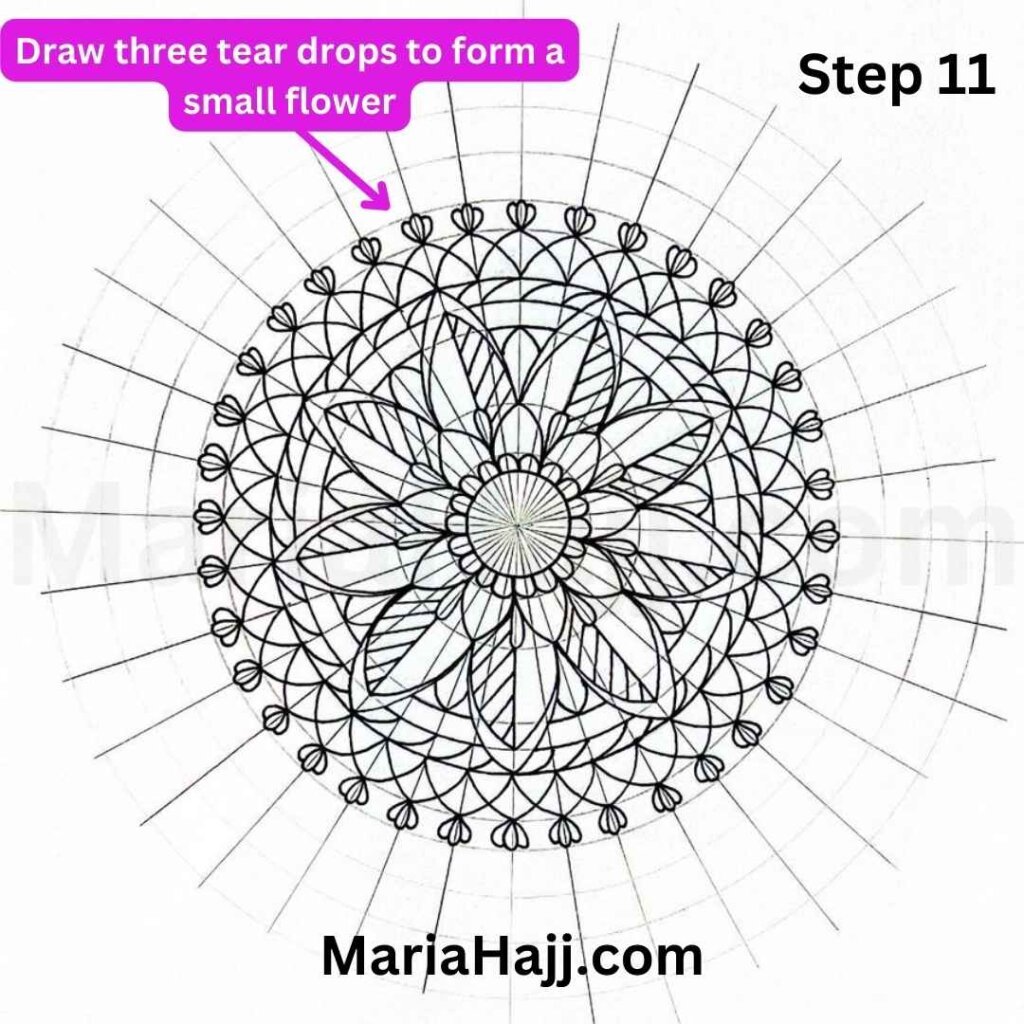
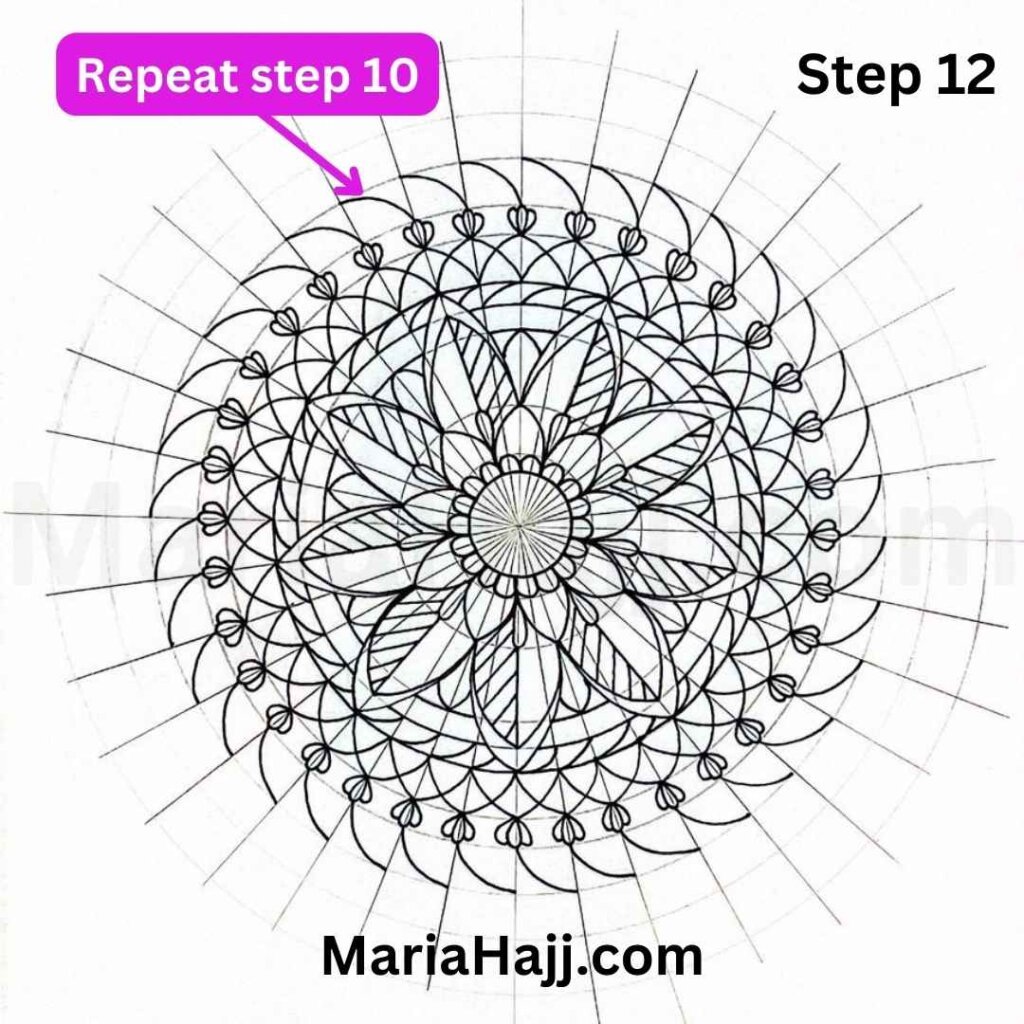
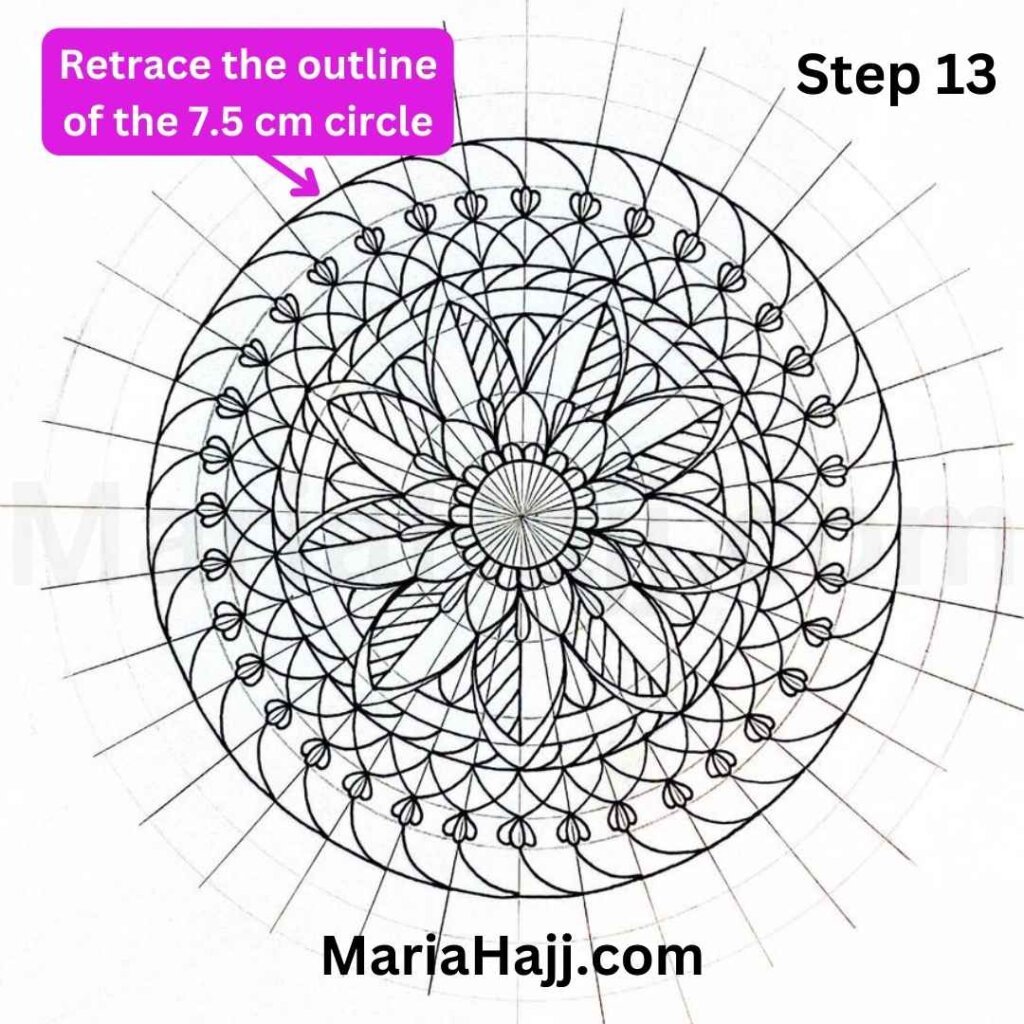
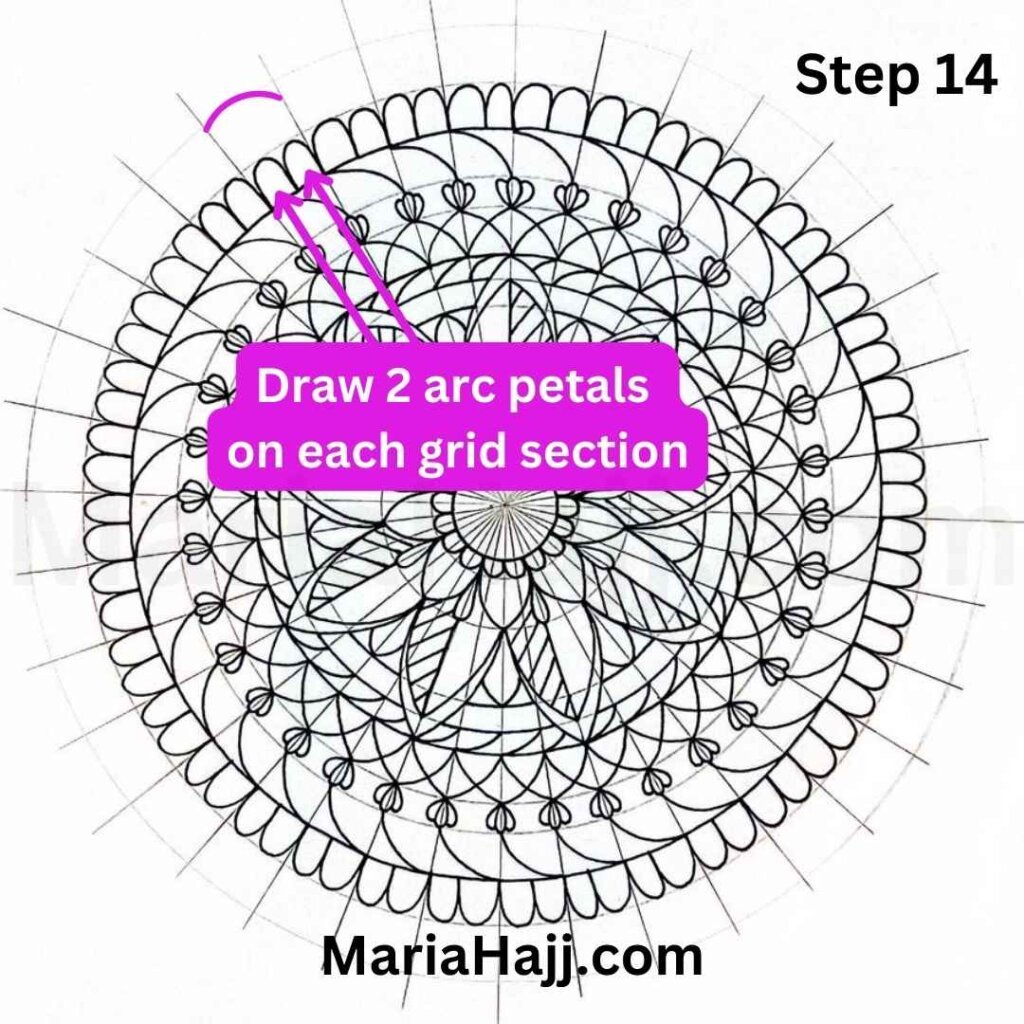
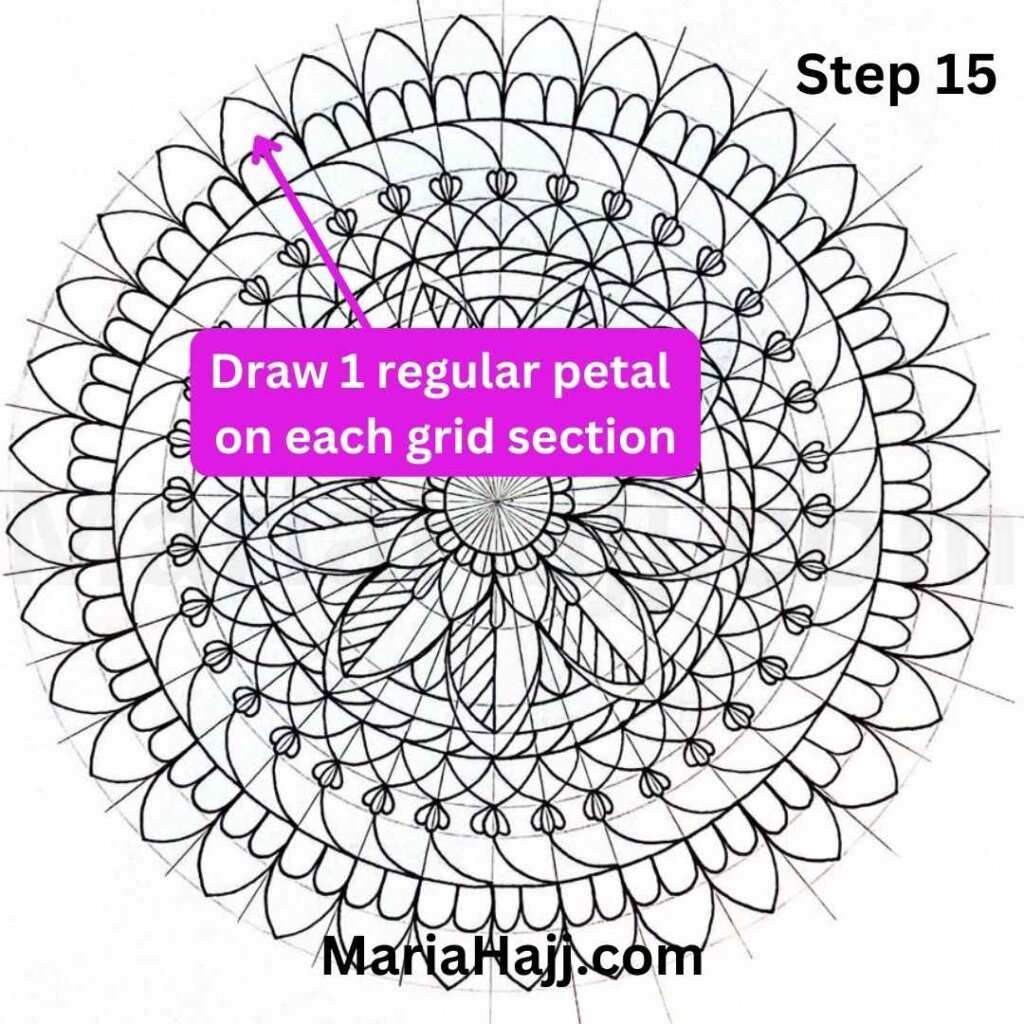
This is the full mandala tutorial presented to you in steps and images to help you replicate this design easily. No mandala is too complicated to recreate, you just have to respect the steps progressively and you will find yourself recreating the most challenging designs. Remember to watch the video tutorial I shared below to get additional help.
a- First part of the mandala drawing tutorial
I divided this mandala drawing instructions into two sections to remind you to take a break, breathe and enjoy the process.
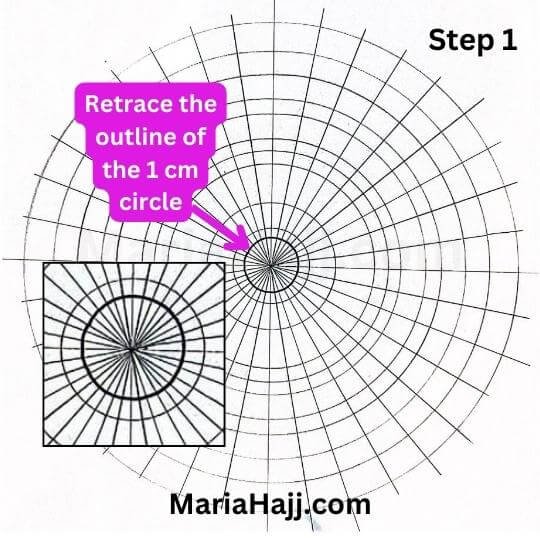
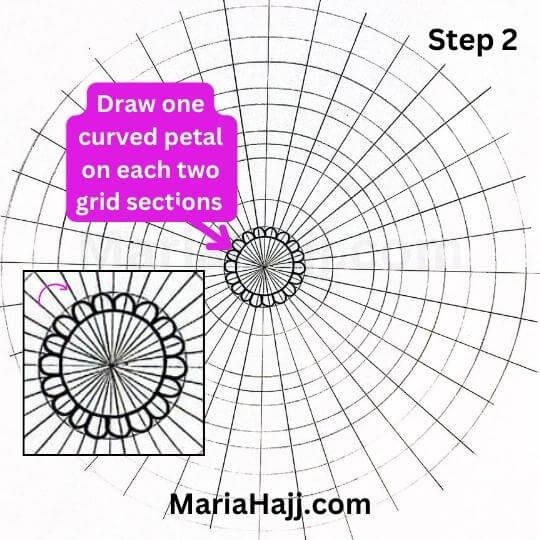
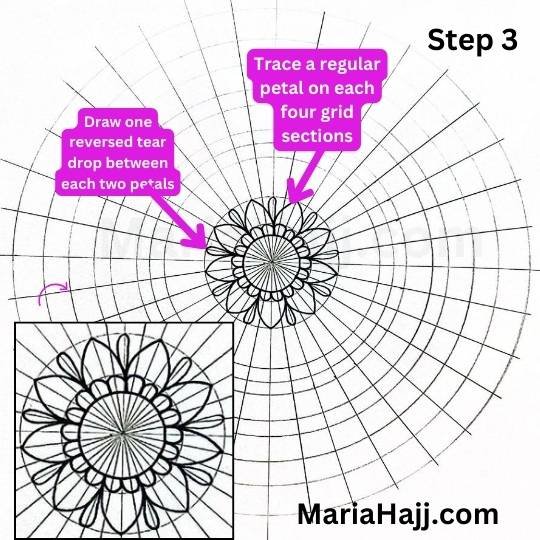
Once this covered, trace a reversed tear drop between each two petals.
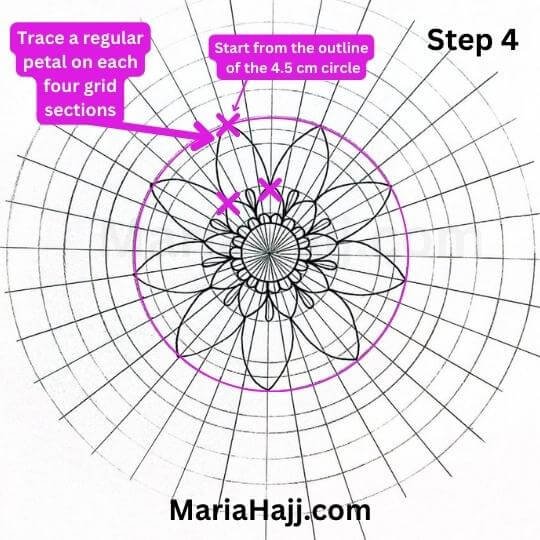
To do so, start the petal from the outline of the 5 cm circle, and the bottom on the outline of the 2.5 cm circle. Make sure to trace each petal on four grid sections.
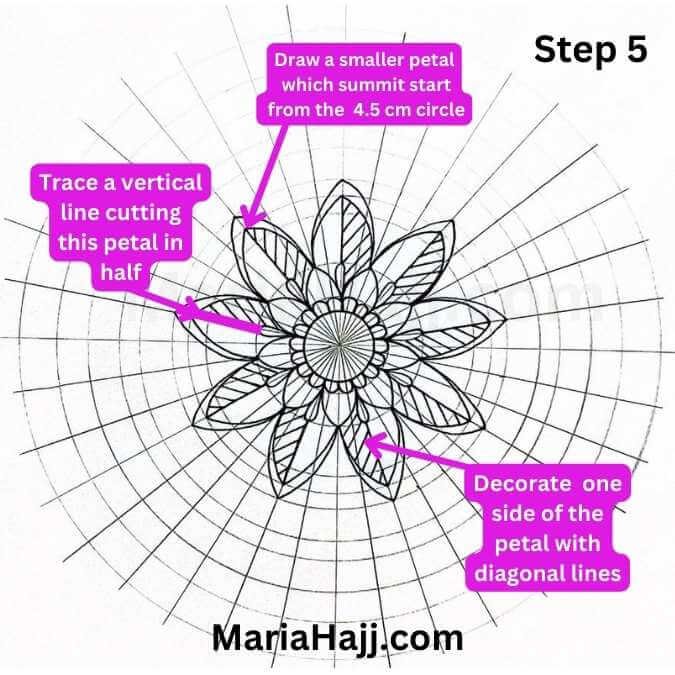
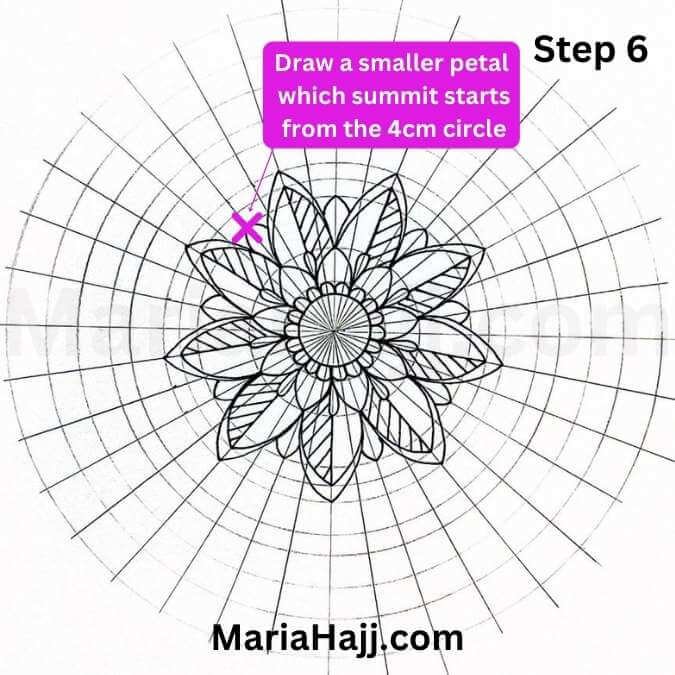
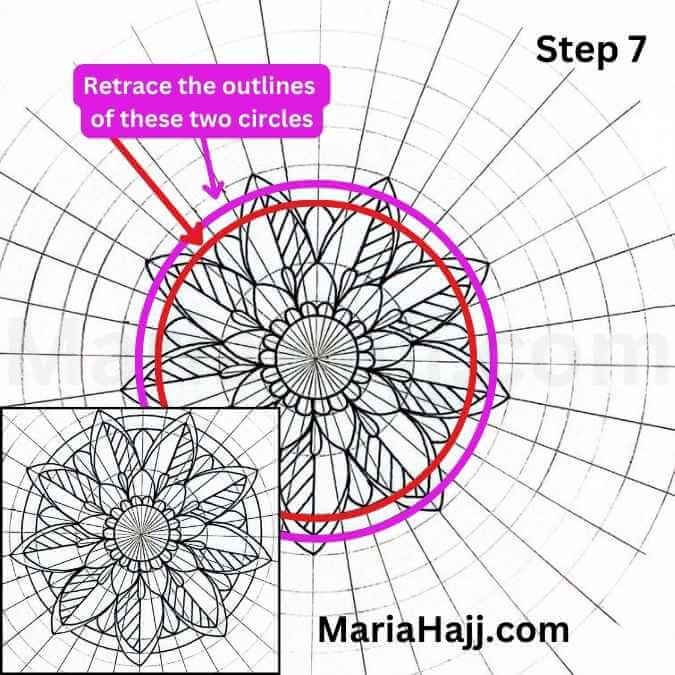
b- Second part of the tutorial
Watch the full video
Thank you for trying this tutorial! It was a true pleasure sharing it with you.
Please remember that drawing a mandala is a very important technique that we use, as art life coaches, in helping our clients express their inner emotions. Therefore, try to enjoy the activity of drawing. In order to do that, you should try to stop worrying about the final result. So, consider this small activity as a way of communicating with your soul. If you make a mistake, leave it. Embrace it. Contemplate it. This is, in fact, your soul telling you let me be, and, let me try new dimensions.
Believe me when I say that unleashing your creative-self starts by allowing yourself make mistakes. Moreover, we were always raised on following the rules so won’t you like, just for once, to break this pattern?
So, I am going to trust that you will let yourself go, and please share your mandala drawing with me on Instagram. It would be a great pleasure for me to see your work.