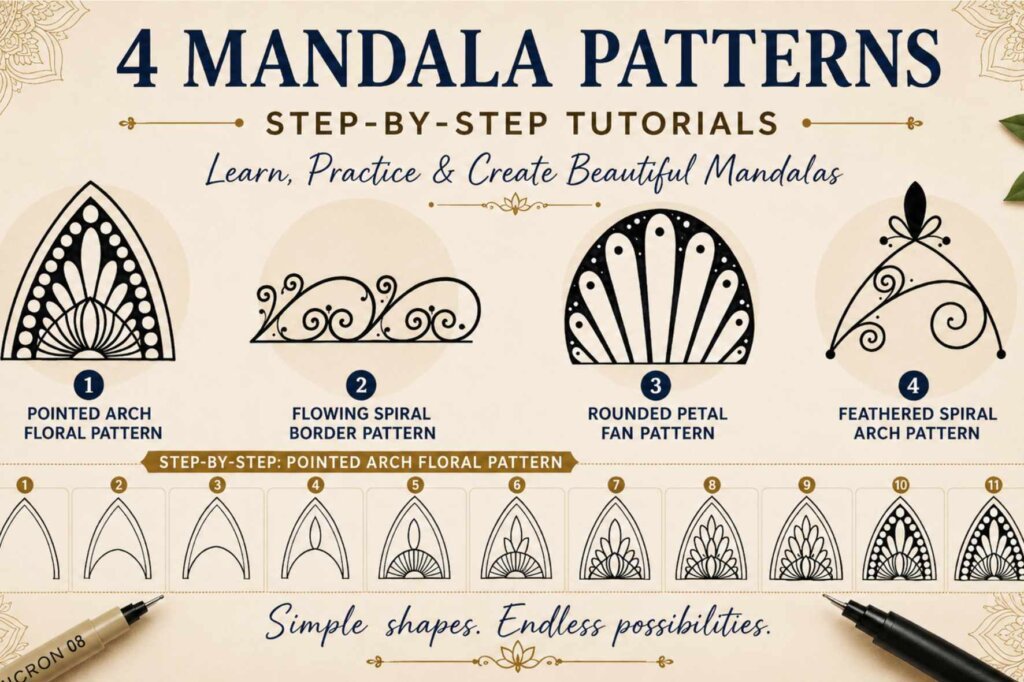
What Is a Mandala Pattern?
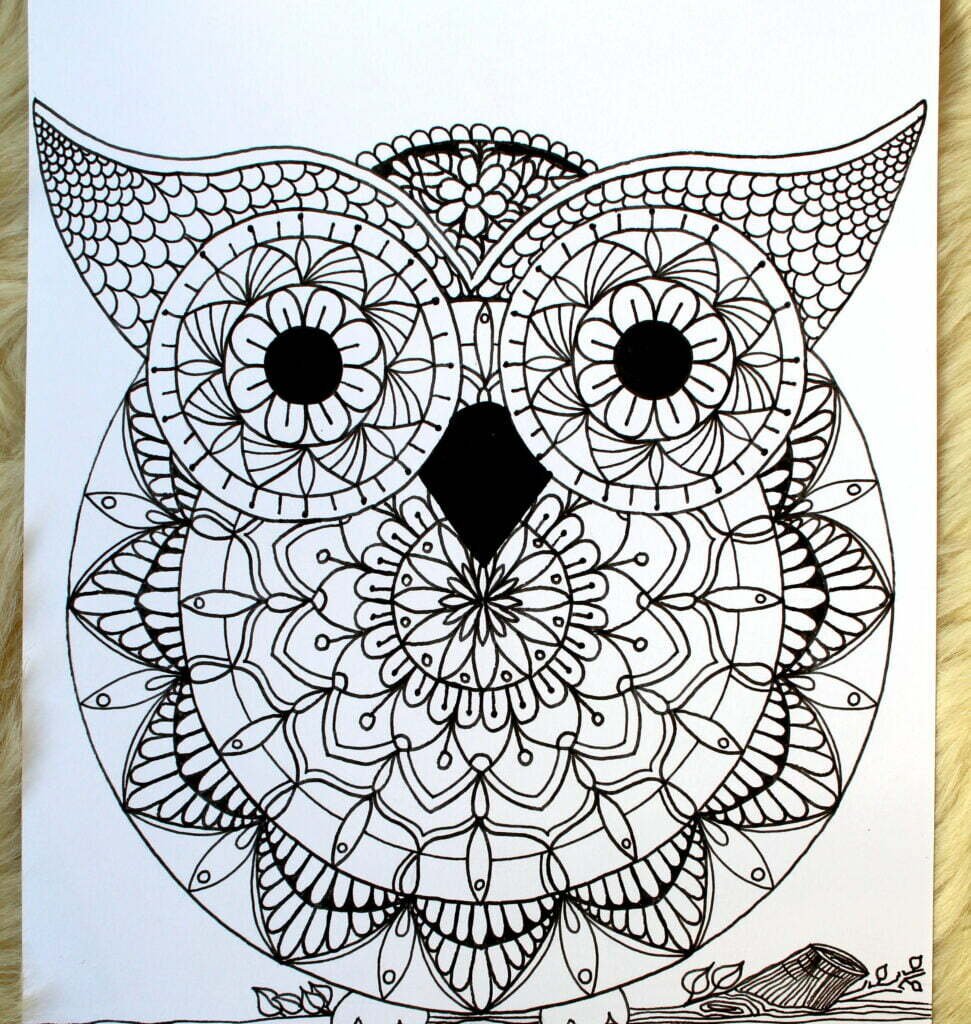
Every beautiful mandala is made from smaller building blocks called mandala patterns. Instead of trying to draw an entire mandala all at once, we first learn these individual patterns, then repeat them around a circle to create a balanced and harmonious design.
Think of a mandala pattern as a single decorative piece of a larger puzzle. It may contain petals, arches, leaves, dots, teardrops, or flowing curves. On its own, it looks like a simple motif. However, when you repeat that same motif around the center of a mandala, it transforms into a rich, intricate work of art.
In this article, you’ll learn four different mandala patterns, each explained step by step. I encourage you to practice every pattern several times until drawing it feels natural. As always, try to draw directly with your fineliner rather than sketching with a pencil first. Every line you draw improves your confidence, steadies your hand, and prepares you for creating complete mandalas with ease.
Once you’ve mastered these four patterns, you’ll discover just how many unique mandalas you can create simply by combining, rotating, and repeating them in different ways. Every complex mandala begins with one simple pattern.
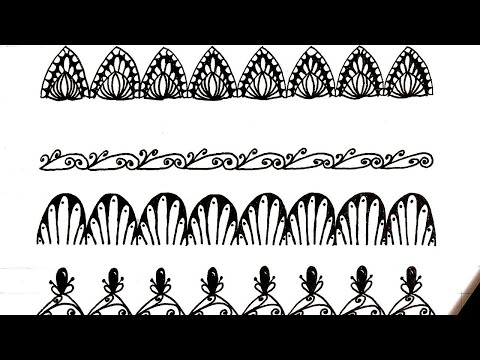
Mandala Pattern 1: Pointed Arch Floral Pattern
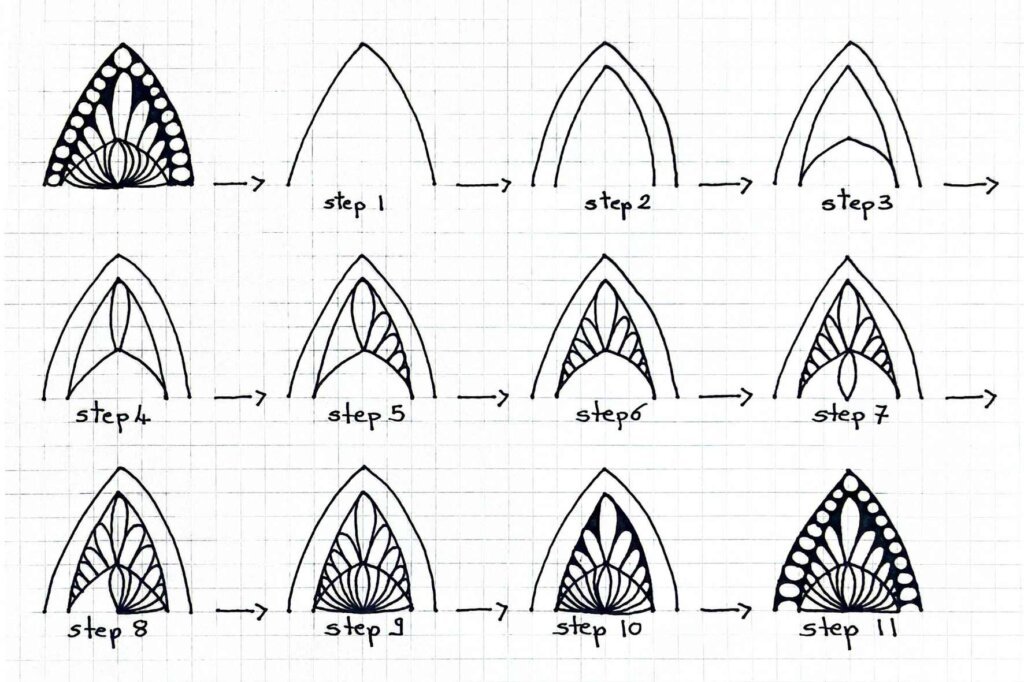
This design combines a pointed arch, elegant petals, flowing curves, and a bold dotted border.
As always, I encourage you to draw directly with your fineliner instead of sketching with a pencil first. Don’t worry about making every line perfect. Mandala drawing is not about perfection; it is about training your hand, building confidence, and learning to create smooth, controlled lines. Every pattern you draw makes the next one easier.
Take your time, enjoy each step, and let the pattern grow naturally.
Step 1: Draw the outer arch
Start with a tall pointed arch.
Draw the left side as a smooth curved line that rises toward the center. Then mirror the same curve on the right side. Join both sides at a rounded point at the top.
Try to keep both sides as even as possible.
Step 2: Add the inner arch
Inside the first arch, draw a second smaller arch that follows the same shape.
Leave an even space between the two arches. This space will later become the decorative outer border.
The inner arch should begin and end slightly inside the bottom points of the outer arch.
Step 3: Create the lower curved section
Inside the smaller arch, draw a wide upward-curving line.
Begin near the lower left side of the inner arch, curve upward toward the center, then bring the line back down toward the lower right side.
This shape should look like the upper half of a circle or a shallow dome.
Step 4: Draw the central upper petal
Find the middle point at the top of the curved dome.
From this point, draw a long narrow petal rising toward the top of the inner arch. Bring both sides of the petal together near the upper center.
The petal should be slim and symmetrical, with a pointed or softly rounded tip.
Step 5: Add petals on the right side
Starting beside the central petal, draw a row of curved petals that gradually become smaller as they move downward.
Each petal should begin near the central area and curve outward toward the right side of the inner arch.
Slightly overlap the petals or place them closely together so they create a layered fan.
Step 6: Repeat the petals on the left
Mirror the same petal arrangement on the left side.
Begin beside the central petal and work downward toward the left edge of the curved dome.
Keep the number, size, and direction of the petals as close as possible to the right side.
At this stage, the upper section should resemble a symmetrical flower or feathered fan.
Step 7: Add the lower central petal
From the center of the dome, draw a long petal pointing downward.
The petal should be narrow near the center, widen slightly in the middle, and close again at the bottom.
This petal divides the lower part of the design into two equal sections.
Step 8: Draw the lower fan lines
Fill the lower semicircular area with curved lines.
Start each line from the central point beneath the upper petals. Curve the lines outward and downward until they meet the bottom edge of the dome.
Add several lines on both sides of the central downward petal.
Keep the spacing fairly even. These lines should resemble the ribs of a shell or an open fan.
Step 9: Add overlapping curved details
Now add more curved lines between the existing lower fan lines.
These extra curves can cross or overlap slightly, creating a woven or layered effect.
Work symmetrically from the center outward. Avoid making the section too crowded; leave enough white space for each line to remain visible.
Step 10: Fill the upper background
Inside the inner arch, fill the empty background around the upper petals with solid black.
Do not fill the petals themselves. Keep them white so they stand out clearly against the dark background.
Carefully work around every curved edge. A fine pen is useful near the petals, while a thicker marker can fill the larger spaces.
Step 11: Decorate and fill the outer border
Fill the space between the outer and inner arches with solid black.
Before filling it completely, draw a row of small white circles or oval dots along both sides of the arch. Space them evenly from the lower corners toward the top.
To keep the circles white, draw them first and carefully color around them. You can also fill the border in black and later add the dots with a white gel pen.
Finish by thickening any uneven outlines and correcting the symmetry.
Final details
Once your pattern is complete, look over the design and slightly thicken any lines that need more definition. If one side isn’t perfectly identical to the other, don’t worry. Handmade mandalas have their own character, and every drawing helps improve your precision and control.
The finished design should have:
- A bold pointed outer frame
- A dotted black border
- A white floral fan in the upper section
- A shell-like curved pattern at the bottom
- Strong black-and-white contrast
Take a moment to admire your work before moving on to the next pattern. The more you practice drawing directly with your pen, the steadier your hand will become, and soon you’ll be creating these designs naturally without hesitation.
Mandala Pattern 2: Flowing Spiral Mandala Border
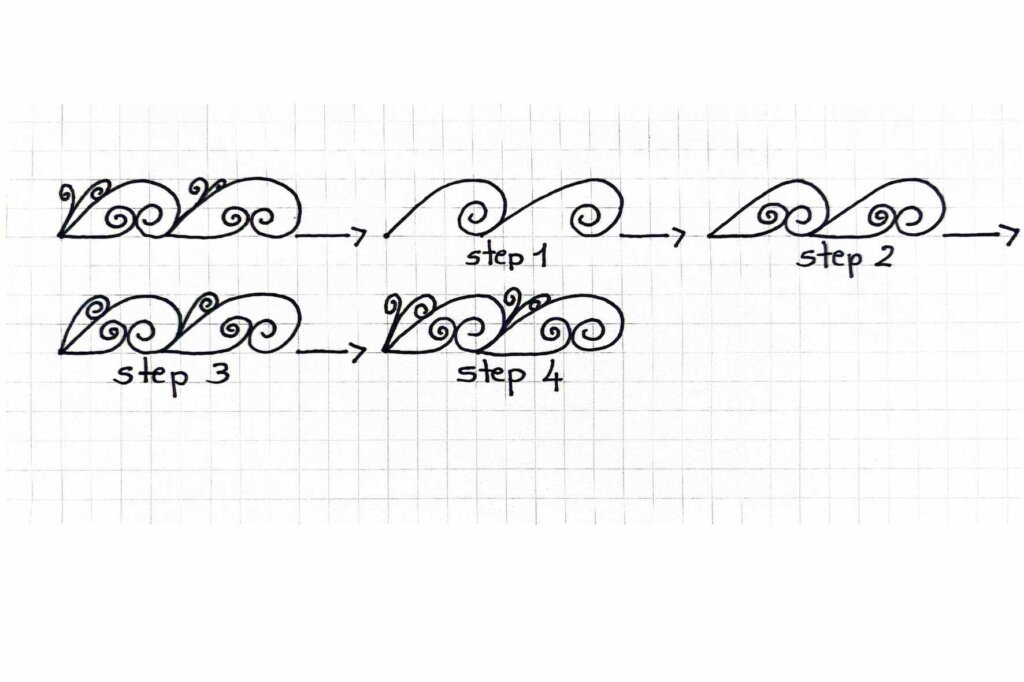
This second pattern is built from a repeated wave shape decorated with spirals and small curled leaves. It works beautifully as a border around a mandala circle or as a decorative band between two larger sections.
As always, draw directly with your fineliner. Keep your hand relaxed and let the curves flow naturally.
Step 1: Draw the main wave
Start from a small point on the baseline.
Draw one long curved line that rises smoothly, rounds over the top, and curls inward to form a spiral. Bring the spiral toward its center without allowing the lines to touch.
Then begin a second wave beside the first one. Start from the end of the first shape and repeat the same rising curve and inward spiral.
Try to keep both waves similar in height and width.
Step 2: Close the bottom of each wave
Return to the starting point of the first wave.
Draw a low curved line along the bottom, following the baseline. As you approach the spiral, curve the line upward and inward to create a second smaller spiral facing the first one.
Repeat the same movement beneath the second wave.
Each section should now look like a flowing leaf or wave containing two spirals that face one another.
Step 3: Add the first upper curl
Go back to the pointed beginning of the first wave.
From this point, draw a thin curved stem rising inside the large shape. Curl the end inward to create a small spiral near the upper left side.
Keep this curl smaller than the two main spirals.
Then repeat the same detail at the beginning of the second wave.
Step 4: Add the final decorative curls
Beside each small upper spiral, draw another short curved stem.
Shape it into a narrow leaf-like curl with a tiny spiral at the end. Keep the two small upper decorations close together so they appear to grow from the same starting point.
Repeat this detail on the second wave.
Your finished pattern should include:
- Two connected flowing waves
- Two large upper spirals
- Two smaller lower spirals
- A pair of delicate curls at the beginning of each wave
- A smooth horizontal rhythm that can be repeated around a mandala
When using this pattern inside a mandala, repeat it evenly around the circle. The waves may curve slightly to follow the circular guideline, while the spirals remain facing inward or outward, depending on the effect you want.
Mandala Pattern 3: Rounded Petal Fan Pattern
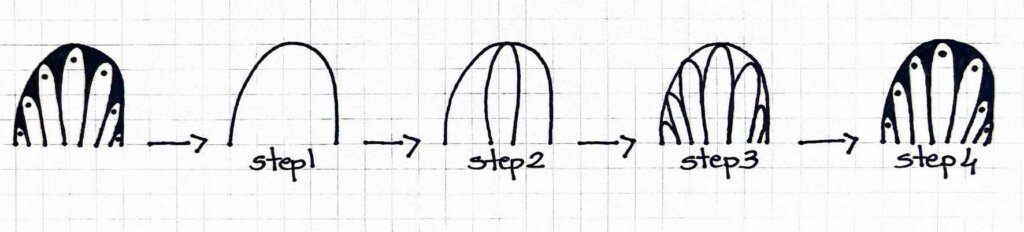
This pattern is made from a rounded outer shape filled with long petals that gradually decrease in size toward both sides. The bold black background makes the white petals stand out clearly.
Draw directly with your fineliner, and allow each curved line to flow naturally.
Step 1: Draw the rounded outer shape
Begin at the lower left side.
Draw a smooth curved line upward, round it gently across the top, then bring it down toward the lower right side.
The shape should resemble a wide dome or an upside-down letter “U.” Try to keep both sides balanced, but do not worry if they are not perfectly identical.
Step 2: Add the three central petals
Start with the tall petal in the center.
Draw one curved line from the bottom center upward until it nearly reaches the top of the dome. Then draw the second side back down to form a long, narrow petal.
Next, add one petal on each side of the central one. These two petals should be slightly shorter and lean gently outward.
At this stage, you should have three tall petals filling the middle of the shape.
Step 3: Add the smaller side petals
Continue filling the remaining spaces on both sides.
Draw another curved petal beside each of the three main petals. Make these new petals shorter and angle them farther outward.
Then add one or two smaller petals near each outer edge. Reduce their height gradually as you move toward the bottom corners.
The finished arrangement should look like a fan, with the tallest petal in the center and the smallest petals at both sides.
Step 4: Add the dots and black background
Place one small black dot near the rounded tip of each white petal.
Next, fill the empty spaces between the petals with solid black ink. Also fill the narrow spaces between the outer petals and the curved border.
Work slowly around the edges so the petals remain clean and white. You can use a finer pen near the outlines and a thicker drawing pen for the larger black areas.
Once complete, the design should have:
- One rounded outer frame
- A tall central petal
- Matching petals that decrease in size toward both sides
- A small dot inside each petal
- A bold black background that creates strong contrast
When adding this pattern to a mandala, repeat it around a circular band. Allow the bottom of each fan to follow the curve of the circle so the repeated sections connect smoothly.
Mandala Pattern 4: Feathered Spiral Arch Pattern
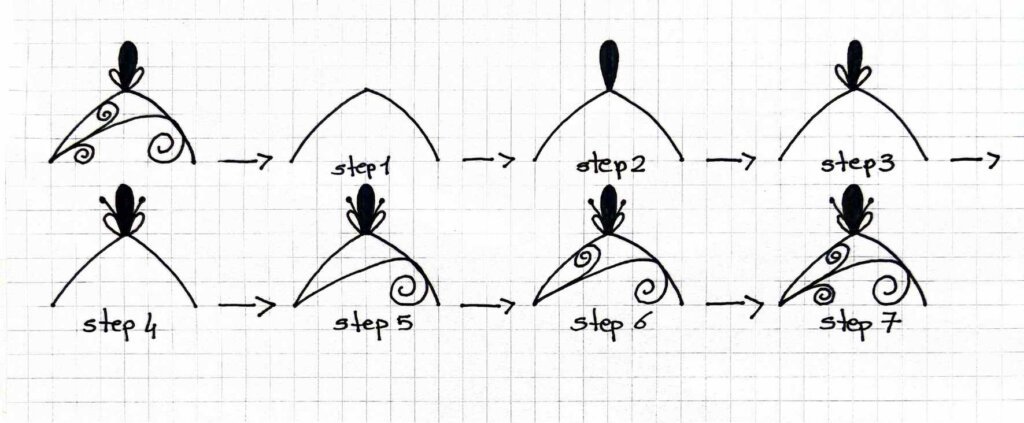
This decorative mandala pattern combines a simple arch with a small feather-like ornament and flowing spiral lines. It works well along the outer edge of a mandala or inside a wide circular band.
As always, draw directly with your fineliner. Keep your hand relaxed and allow the curves to develop naturally.
Step 1: Draw the main arch
Begin at the lower left point.
Draw a smooth curved line upward until it reaches a gentle point in the center. Then continue the line downward toward the lower right.
The result should look like a low pointed arch or a curved hill. Try to keep both sides balanced.
Step 2: Add the central teardrop
At the top point of the arch, draw a long vertical teardrop shape.
Start at the center point, curve outward on one side, round the top, and return to the same point on the other side.
Fill this teardrop completely with black ink.
Step 3: Add two small side loops
Draw a small narrow loop on each side of the black teardrop.
Both loops should begin and end at the central point where the teardrop meets the arch. Angle them slightly outward so they resemble two small leaves.
Together, these three shapes create a simple feathered ornament.
Step 4: Add the finishing side strokes
Draw one short curved stroke beside each small loop.
Add a small dot at the tip of each stroke. Keep the details light and delicate so they do not overpower the central black teardrop.
The ornament should now resemble a small feather or decorative crown growing from the top of the arch.
Step 5: Draw the large inner spiral
Return to the lower left end of the arch.
From this point, draw a long sweeping curve that travels upward and across the inside of the arch.
As the line approaches the right side, curl it inward to form a large spiral. Leave a small gap between the spiral and the outer arch.
This long curve divides the arch into two flowing sections.
Step 6: Add the upper spiral
Inside the upper section, begin near the lower left point again.
Draw another curved line that follows the direction of the large inner curve. Bring it upward and curl the end into a small inward spiral near the upper-left area.
Keep this spiral smaller than the one on the right.
Step 7: Add the lower spiral
In the remaining lower-left space, draw one final small spiral.
Begin close to the lower-left point, curve the line gently inward, and finish with a neat curl.
The three spirals should differ in size but follow the same flowing direction.
The finished pattern includes:
- One low pointed arch
- A black central teardrop
- Two small leaf-like loops
- Two delicate strokes with dots
- One large spiral on the right
- Two smaller spirals on the left
- A flowing asymmetrical composition
When placing this pattern inside a mandala, repeat it around a circular guideline. The pointed ornament can face outward, while the spirals flow around the circle to create movement and rhythm.