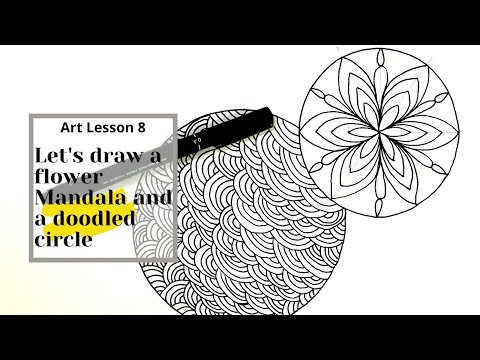
In this tutorial, there is a Mandala and a zentangle.
What is the difference between the two?
A mandala is made from a number of circles organized around the same center. As for the zentangle, it’s a well-defined shape decorated by doodles. So the flower in this tutorial is the Mandala, because, if you notice, the petals are repeated in well-organized circles around the same center.
The second circle in this tutorial is a zentangle in which I used the pattern of the seamless curve.
Both art techniques, Mandala and Zentangle, are excellent to alleviate stress and put you in a relaxing mood. They both help your mind stay focused on the art project and forbid it from wandering to dark places.
This Mandala art tutorial is categorized as easy, the patterns and shapes used are very simple and as a beginner, you will learn fast how to replicate this design.
How to draw this easy Mandala design

Material Needed:
(Check the brands I recommend)
In order to replicate this beautiful design you need the following materials:
- A4 white paper
- Compass
- Protractor
- Ruler
- Pencil
- Eraser
- Black drawing pen
Directions
- Draw a 5 cm radius circle on the top left of your paper.
- Then, measure 6.5 cm and draw a circle which center is the center of the paper.
- The first circle traced will be a Mandala, therefor for tracing it we need a Mandala grid: Trace a horizontal and a vertical line crossing the center of the circle, then using the protractor mark a point every 30 degrees and trace the grid lines. Draw three circles with the following radiuses: 2, 3, and 4 cm.
- In the first circle, start by drawing petals on each 2 grid sections.
- On the second row, trace the same petals. Let each petal on the 2nd row start from the side of the previous petal (on the first row) and end on its other side. (More details in the video tutorial below)
- Follow the same step for the two remaining rows.
- Once the petals are drawn, add a tear drop between each 2 petals, having as a limit the outline of the 4 cm circle.
- On top of each tear drop draw a reversed tear drop (further details in the video tutorial below)
- Retrace the outline of the 5cm circle.
- For the bottom circle, the one reserved for the zentangle, start drawing seamless curves until the whole circle is filled.
Video Tutorial
This Mandala tutorial is best understood when you watch the video. The description above will, of course, give you additional help.